Re: tr3 lever action shocks Redux
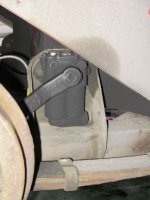
Yes, in the picture, the filler hole is the hex head just to the right of the lever, maybe 1/2-3/4" down from the top lip of the shock.
Clean around it really well before removing (you don't want *any* dirt getting inside the shock), unscrew it and fill until the oil overflows. It also serves to measure the correct amount of oil contained in the shock, when the shock is held vertical (just like a gearbox or differential filler hole, but on a smaller scale).
Since the filler hole is on the side and the shock needs to be held upright during final filling, something to "inject" the oil might be useful. I've got a large plastic syringe-like tool that was originally designed to force oil into cables. It works well for this purpose. Some oils come with caps that help, too.
You can lean the shock over initially and add *some* oil - roughly 2/3 or 3/4 - then place the shock in a vise to hold it upright for final topping off.
After adding roughly half or 2/3 of the oil to the shock, start to operate the lever up and down the full stroke a number of times to work air out of the valve mechanism. Gradually add more oil and continue operating the lever until (hopefully) the full stroke is nice and smooth over it's entire arc, both upward and downward.
If the shock continues to feel "gritty" or rough in it's operation, anywhere along the arc of the lever, or there is little or no resistance, or it leaks badly at the lever shaft, it will need a rebuild.
The shock pictured looks to have some oil gathered on the outside. It *might* be due for a rebuild, if there is a lot of leakage. Or, it could just be many years of accumulation from minor seepage and nothing to worry about. The only way to tell is to clean it off thoroughly, refill it with fresh oil and observe closely for a lot of new leakage. Slight seepage by the lever shaft seems to be normal.
Another thing. When removing the shock from the car, those bolts holding it to the bracket can be difficult to get onto with a socke. There is very little clearance in there to work. If you can't get a socket onto the bolt head, try slipping a large-bladed screwdriver between one of the flats of the bolt head and the body of the shock, to hold the bolt from turning while you remove the nut from the backside of the bracket. Be careful to not damage the shock body, which is cast pot metal or aluminum. This screwdriver "trick" usually works unless there is a lot of rust. If rusted and frozen, I'd just carefully cut the nut and bolt at the back, with a Dremel tool.
Next, when you reinstall the shocks, replace the 4 bolts (2 per shock) with 3/8" NF socket-headed bolts. With these, you can use a long allen wrench to hold the bolt while tightening the nut on the inside. This makes it much easier to install, remove or just check that the bolts are snug in the future.
Because this is a fixture prone to vibration, try to get bolts that have a longer shank (unthreaded portion), so that threads aren't inside the hole in the shock or the bracket. This is so the bolt threads don't "mill" the hole oversize over time and might mean adding a washer or two or three to the backside so that the nut can be fully tightened. Be sure to use new Nylock nuts to prevent vibration loosening. And maybe add some blue or medium strength Locktite as a little extra security.
You might need some sort of tool to break loose the shock links from the lever, too. I've found a small tie-rod tool that works well for this (plus TR tie-rod ends & ball joints). It's listed as a VW tie-rod tool at JC Whitney.com, item #ZX881770B and sells for $11 or less. New shock links are recommended if the ones on the car are more than a few years old.
Again looking at your photo, the leaf springs look like they could use a soak of old motor oil or penetrating oil. The leaves of the springs slide against each other and act to augment the dampening action of the shock absorber. If the spring leaves are rusty in between, this can effect rear suspension action. Best way would be to remove the springs for a nice long soak in an used-motor-oil "bath". But that's a lot of work, usually means installing new bushings at the shackles and, possibly, replacing the front eye bushing. Perhaps you could accomplish a lot just by carefully spraying some penetrating oil or brushing some old motor oil on them. Redo this several times after driving the car for a while and "working" the suspension. Then make it a regular service item to oil the leaf springs every once in a while, depending on how much road time the car sees.
One last thing, while the shocks are removed is an ideal time to clean the brackets really well and inspect their welded attachments to the frame. Look for *any* signs of cracking or fatiguing. From the picture, this one looks okay. But careful and close inspection is highly recommended. After cleaning and inspecting, paint to protect from corrosion.
Hope this answers your questions.
Alan Myers
San Jose, Calif.
'62 TR4 CT17602L
 Hey there Guest!
 Hey - did you know if you click on the title of a thread it will take you to the first unread post since you last visited that thread?
 but were afraid to ask:
  STOP!! Never post your email address in open forums. Bots can "harvest" your email! If you must share your email use a Private Message or use the
  smilie in place of the real @
 Pretty Please - add it to our Events forum(s) and add to the calendar! >>
 A friendly reminder - be careful what links you click on here. If a link is posted by someone you don't know, or the URL looks fishy, DON'T CLICK. Spammers sometimes post links that lead to sites that can infect your computer, so be mindful what you click.