• Hi Guest!
    If you enjoy and benefit from your participation at British Car Forum, please consider supporting our efforts with a subscription.

    There are some perks with a member upgrade!
    **Upgrade Now**
    (PS: Subscribers don't see this banner)
Tips
Tips

TR2/3/3A Rear sheetmetal repair

Frank Canale

Jedi Warrior
Silver
Country flag
Offline
I am going to take a break from the front end tub and inner sill alignment and start working on repairing the back half. There is an awful lot of repair work to be done and am very grateful for the post Lionel did with his incredible metal forming skills. I am going to start with some easy pretty safe repairs.
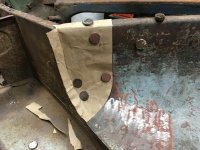
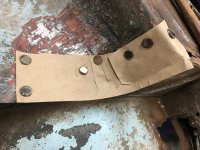
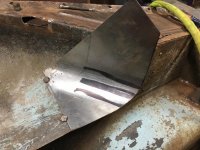
IMG_0818.jpgThis is my template to cut and form the repair panel from.
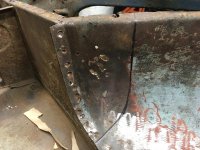
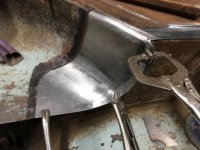
IMG_0819.jpgThis shows the spot welds drilled out. The boot floor is going to be replaced so damage from drilling thru is not a big deal. The new repair panel is clamped in place and scribed to be cut. I usually cut small areas like this with a dremel using the heavy duty cut off wheels. You can cut right on the scribe line for a very good fit.
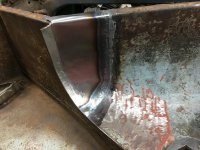
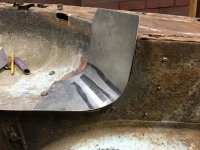
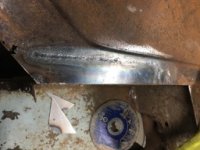
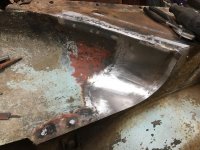
IMG_0820.jpgRepair panel welded in place and a little hammer and dolly work. I have not decided if I am going to need any grinding as I will probable use some type of undercoating to the inner wings. I may come back with a quick pass over it with a sanding pad. The red area on the new repair is a reflection, it is new 18 gauge metal. I did not notice it when I took the picture. with this repair there is a little shrinkage at the weld but the curved shape helps to minimize the warpage. Keeping the heat affected area consistent also helps. Frank
 
Looks very nice. My welding never got that good.

Took a few minutes to realize that you were using magnets to hold the pattern.

David
 
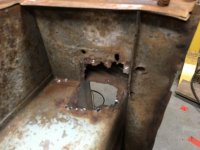
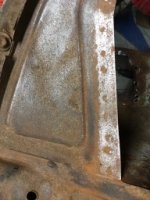
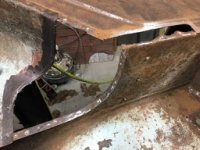
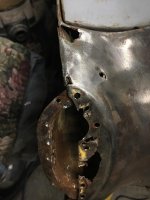
IMG_0837.jpgOn the inside of the spare tire compartment there were patches welded to the inside covering the rusted wall that the rear body mount is spot welded to. I knew this was what I would find when I removed the body mount and the patch. I already have the body mounts made and they are a little tricky to make.
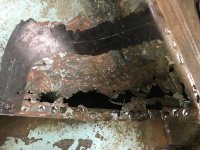
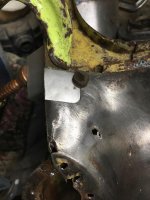
IMG_0838.jpgOn the same side (drivers side) This is the same repair to the inner wing as before just a little bigger. The larger repair is making the repair patch a little harder to get to fit like it needs to. Shrinking the patch is what is needed and that is what makes it hard to make. The template photo is too large to post so I will take another and include it when I show the repair as it progresses. Frank
 
Nice work Frank. I think it is smart to jump around some on tub; it helps to let other stuff percolate. I find I come back fresher. If I ever do another one, I want to try some more of those seamless patches.
 
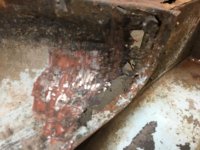
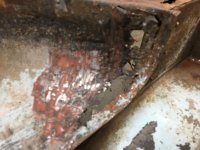
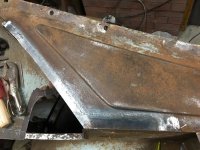
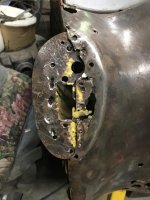
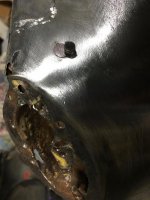
IMG_0838.jpgThis shows the damage to the driver side rear inner wing after the patch was removed from the inside and the goop that covered the outside.
IMG_0840.jpgThis shows the template with the over laps in the curve indicating that it needed to be shrunk in this area. This turned out to be a mistake. After 2 attempt to shrink this area it only yielded a beat up piece of sheetmetal. There is no bowl shape to this area, it is curved but is flat if that makes since. I took a larger piece of paper and turned it perpendicular to the curved area and it fit with very minor wrinkling. I cut a larger piece of sheetmetal and drew lines on it to represent the curve. put it in the english wheel with a rubber band on the top wheel so that it only curved the metal in one direction without stretching the metal. That put me on the right track.
IMG_0848.jpgThe piece fit in nicely enough I could do an initial scribe line along the bottom of the inner wing and cut that excess off. The lines show the direction of the curve.
IMG_0850.jpgThis shows a little more whittled off the repair piece. I do not think I could have made a template cut the piece out and formed it to fit. I had to form the curve and then start removing excess a little at a time as the piece fits a little better each time.
IMG_0841 (1).jpgThis is how I find the spot welds to drill them out to remove pieces to be repaired. A piece of 80 grit sand paper sand over the spot welds and this will leave a dot where the spot weld is either paint or rust but it makes them easier to find. I use a 3/8 " pilot point drill that drills the spot weld and the outer area helps to keep from drilling thru the panel I am trying not to damage. Some times I end up using a 3/8" ball end rotary burr that also works well if you have one side of the spot weld that is still holding on.
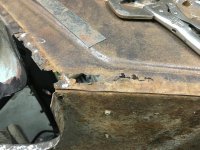
IMG_0854.jpgSpot welds being drilled out trying not to disturb the boot floor flange that the repair will join. The boot floor will be replaced later but for now I need it to get this repair correct. The area that will be cut out has been scribed. I use a magnum sharpie to darken the area so I can see the scribe line better.
IMG_0855.jpgThe damage has been rough cut leaving about 1/4" to be cut once the flanges under the repair can be repaired.The cut out area is not easy to see in this picture . I will have a better shot in the next post . This is the lower part of the boot side wall. An easy repair that will be cut out and a new piece welded in. Hope the long post are not too boring. This repair helped me to see that you can not get locked into a train of thought, if it is not working try another approach. Frank
 
Hello Frank.

It is looking great.

I remember that part of the work well. I do not have an English Wheel so all my bending was done over a pipe or block.

I was watching a guy doing repairs on you tube. His method was to cut the hole out a little smaller then the patch then tack the repair in place. Next he would cut through the old piece at an angle in short cuts welding in as he went. I will post a link if I can find it.

David
 
IMG_0856.jpgDamaged rust removed. lower side wall flange removed.
IMG_0857 (1).jpgSide wall lower flange patch. This patch fit really well. makes the welding easier.
IMG_0858 (1).jpgPatch tacked using no filler wire. the tacks just fuse the two pieces together.
IMG_0860 (1).jpgPatch welded. this patch was welded from one end to the other without stopping. The only filler metal is at the very end where it tends to melt a keyhole so i add a little filler metal to end the weld.
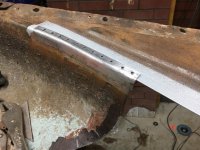
IMG_0859.jpgThe large patch fitted with the flanges. This will be welded in after the flange under it is repaired.
 

Attachments

  • IMG_0857.jpg
    IMG_0857.jpg
    24.6 KB · Views: 254
  • IMG_0858.jpg
    IMG_0858.jpg
    23 KB · Views: 238
  • IMG_0860.jpg
    IMG_0860.jpg
    23.1 KB · Views: 237
Nice work Frank, I truly enjoy following along in the process. Metal work is something I have watched for years and working with more and more. Was your car Powder Blue? I have painted 2 cars powder blue mostly because that was the original color---but and people love it. I am actually a black car guy, but one of my friends said keep the color light because the car can turn into a blob with darker colors because it so small-IMHO
 
Yes my car was originally powder blue. My plan is to paint mine apple green like the works rally cars. That color was not offered in 1960 but I like that color and you hardly see one that color. Frank
 
Great choice of a color, I still have TS 29178; the car was original painted Apple Green Lacquer. I stripped the car first time in 1971 and painted it Cadillac Diplomate blue which is basically (midnight blue). Next time if there is I am going back to Apple Green
 
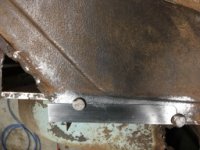
IMG_0867.jpgside wall flanges repaired. This type or repair lends itself to the shrinker and stretcher really well. The flange repair is 18 gauge x 1" And it was very easy to curve the flange the hard way so it matched the cut out piece.
IMG_0868 (1).jpgThis is the inner wing flange. formed the angle then shrink and stretch to fit the curve. Holes are punched to be spot welded as we can start to put this area back together. Where the flanges meet are sprayed with zink primer.
 
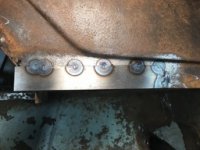
IMG_0872.jpgMore progress as the rear of the inner wing is done. Spot welds along the back flange did not turn out as good as I would like. I am going to have to abandon the primer between the flanges, causes too much weld contamination. trying to decide the next area to repair. More repairs to come. Frank
 
I was planning to work on the rear wheel arches but not sure about the correct approach so I started another area. This is what I have been working on.
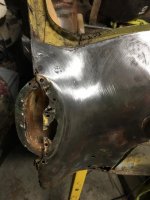
IMG_0873.jpgThe driver tail light mount.
IMG_0874.jpgtail light mounting plate removed
IMG_0875.jpgPatch at the corner of the boot corner fitted ready to weld
IMG_0880.jpganother patch ready to weld
IMG_0881.jpgclosing panels that the rear body mount get welded to
IMG_0882.jpgClosing panels with flanges folded. This is a tricky panel to form because the top flange is folded the opposite way of the rest of the flanges.
IMG_0883.jpgBack side of the panel
IMG_0885.jpgPatches hammered and dollied and sanded. This area is difficult to get a dollie behind the patch so the finish is not as good as I had hoped but the area feels smooth so it will take minor filler to tidy up the weld area.
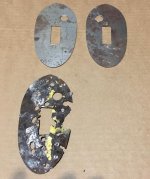
IMG_0887 (1).jpgTail light mounting plates. In the picture the original looks bigger but the new ones are the same size.
Frank
 
I've gotta ask...how did you form the closing panels? Are they hydroformed, or welded? Either way I am very impressed they came out so clean.
 
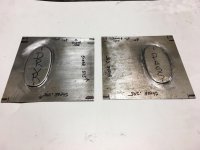
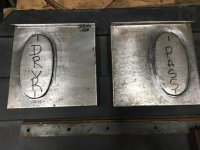
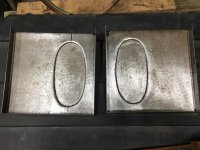
Hi John, Thank you, the closing panels are hammer formed. As most know I like to use templates. I made a paper template from the original Then cut out an oval from !/8" steel that is the offset of the raised area. I layed out the location and used double stick tape to place the oval turned it over and clamped the edge of the panel to the welding table. The oval shape location is also on the top side so I know where to start forming the raised area. This is a warm up to doing the same with the boot floor. My chasing tool needed to be a little blunter as the panel has a little more markings from the tool than I wanted but I am learning. I have a bead roller but this is much more accurate and doesn't take much more time. The chasing tool is a large 1 1/2 inch wide chisel that I blunted the end and sanded smooth and a large ball peen hammer does the trick. Frank
 
Very impressive work Frank. I like the magnets holding the patch in place. Wish I thought of that when I struggled to hold small patches. Burnt my fingers several times when I grabbed a patch as it fell out as I attempted to weld it.

Could you post a few photos of the tool you are using.

David
 
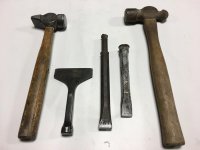
IMG_0893.jpgNot much special about the tools except the hammer on the right. It is a craftsman one of a three hammer set that my mom and dad gave me for Christmas more than 40 years ago. One of my go to hammers
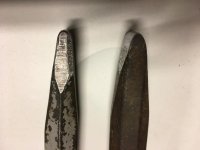
IMG_0894.jpgThe end of the chisel has almost a !/8" radius and I might make it larger if the panel is getting marked up. I think with a little more practice I will be ready to tackle the boot floor. I got a call from the sheetmetal supplier that my sheet of metal will be ready next week.
One thing I need to mention about the magnets. The magnets do not like heat and if they get hot loose their magnetism , but they are very helpful for making templates and for holding patch panels before and during the welding process.
Frank
 
Similar threads
Thread starter Title Forum Replies Date
T TR2/3/3A Rear Wheel Bearing instillation on TR3 Triumph 7
mctriumph For Sale Tr6 rear bumper assembly/with over ride bar Triumph Classifieds 0
L For Sale JAGUAR E – TYPE: IRS REAR AXLE (EARLY), 2,88:1: Jaguar Classifieds 0
L For Sale AUSTIN HEALEY: REAR AXLE Austin Healey Classifieds 0
L For Sale AUSTIN HEALEY: REAR AXEL WITH DISC BREAKS Austin Healey Classifieds 0
Y MGB Possible rear axle issue? MG 0
jfarris For Sale TR 2-4 16MM (5/8”) Rear Sway Bar Triumph Classifieds 0
71TR6 TR2/3/3A TR3 rear axle shims Triumph 7
B MGB Brakes scrapping sound from rear brakes on hard left or right turn. New wheel cyl, drums shoes ? MG 2
B Is the rear edge of the Bugeye bonnet sheet metal supposed to be bent inward? Spridgets 2
71TR6 TR2/3/3A TR3A rear shelf carpet Triumph 6
DornTRoriginal Wanted TR3B Left rear fender Triumph Classifieds 7
5 Wanted Looking for a Rear Cockpit Molding for a BN2 Austin Healey Classifieds 0
J SOLD!! Triumph TR2 TR3 Channel - Drip - Rear Edge Triumph Classifieds 1
petnatcar Rear View Mirror Relocation Austin Healey 0
Carlbanan56 MGB Rear axel torque? MG 4
petnatcar Rear View Mirror Relocation Austin Healey 0
trbby2 TR4/4A TR4A Intermittent rear wheel locking? Triumph 19
Carlbanan56 MGB Rear wheelbearing clicking MG 8
Carlbanan56 MGB MGB rear break rebuild MG 6
B BJ8 Rear Backrest Hinges Austin Healey 4
F For Sale E Type Series II front and rear bumpers good condition Jaguar Classifieds 0
bigjones TR2/3/3A Rear tail light not budging Triumph 5
5 Wanted Wanted 1966 mgb banjo type axle rear hub MG Classifieds 0
scottkilpatrick TR4/4A TR4 Rear Brake Drum Removal - Basic Question Triumph 16
J TR2/3/3A TR2 Fitting/mounting rear wing Triumph 11
Michael Oritt Rear Crank Seal Kit Austin Healey 7
BT7 Owner Rear Crankshaft Bearing Cap Austin Healey 4
O Jaguar rear window trim repair Jaguar 1
Joel Lester TR2/3/3A Is "later" style rear view mirror taller than the "early" style? Triumph 6
S Leaking HD6 Rear Carb Austin Healey 10
B Rear Brake Cylinders Austin Healey 4
WHT BJ8 Rear Seat Surround Drain Tube Grommets Austin Healey 0
Joel Lester TR2/3/3A Do rear leaf springs wear out? Triumph 11
J TR2/3/3A Rear Fuel Line Clips Triumph 3
apbos New long term project. Sprite powered rear engined race car. Spridgets 9
60BN7 Rear Wheel Opening Austin Healey 9
glemon TR5/TR250 Answering My Own Question Rear Tube Shock Conversion Numbers TR4a-TR6 Triumph 0
S TR2/3/3A rear wheel cylinder Triumph 1
K TR2/3/3A Rear tire pressure when there is an anti roll bar at the front of the car? Triumph 1
T Rear/Differential "Clunk" Austin Healey 2
AUSMHLY BJ8 Rear Seat Squab Austin Healey 0
jfarris For Sale TR3 Rear Sway Bar Triumph Classifieds 0
J 3000 Rear Seats Austin Healey 6
KVH General TR Rear Brake Shoe Orientation Triumph 12
Popeye TR4/4A Rear fender attachment: wing to lamp housing clip? Triumph 7
KVH General Tech Rear Brakes and Solid Axle Triumph 2
P Rear Springs Austin Healey 2
K TR2/3/3A Rear leaf spring brass and Delrin bushings ? Triumph 4
KVH General Tech Jacking Up The Rear of TR4 Triumph 5

Similar threads

Back
Top