• Hey there Guest!
    If you enjoy BCF and find our forum a useful resource, if you appreciate not having ads pop up all over the place and you want to ensure we can stay online - Please consider supporting with an "optional" low-cost annual subscription.
    **Upgrade Now**
    (PS: Subscribers don't see this UGLY banner)
Tips
Tips

TR2/3/3A Replacing "H" front badge

TR3Acustodian

Freshman Member
Country flag
Offline
Where the H is my "H"?
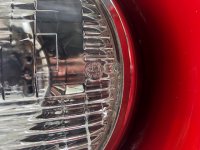
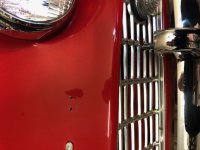
My front TRIUMPH name badge popped off the other day and I've ordered a new set. Any advice on how to replace this? I was going to attempt to reach the press clip by removing the grill but the clips that hold the screws are in such ridiculously hard places to reach I abandoned that idea. Next I thought I could go through the left lamp. Alas the set screw in the 6 o'clock position is no where to be found. Isn't there. I went back to the restoration notes and see that they used an MG headlamp instead. Very similar but it has no set screw, and I have no clue how I can remove it. Can anyone help?????
 

Attachments

  • IMG_7942.jpg
    IMG_7942.jpg
    91.8 KB · Views: 39
  • IMG_7909 (1).jpg
    IMG_7909 (1).jpg
    101.1 KB · Views: 39
Last edited:
OP
TR3Acustodian

TR3Acustodian

Freshman Member
Country flag
Offline
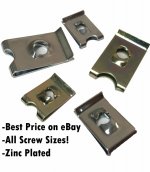
You’ll need to go through the grill if you need to get to the back to fit the letters speed clips.
the headlight binicle is sealed apart from a hole of the wire.
the grill screw clips should remain on the metal.
Thanks Hamish. I wish you were right about the clips remaining in place. I unscrewed the bottom ones and the clips came right off. I was able to easily hold them on but the top ones are another matter. No possible way to get to the back without removing the entire front nose of the car. All this for the letter "H" missing which is driving me nuts.
 

TomMull

Darth Vader
Silver
Country flag
Offline
Unless you have the cardboard wind deflector, you can access the H by reaching past the radiator in the engine bay. You don't even need to remove the grille. The push nut is available at any decent hardware store. I use the flat ones.
I've never had that wind deflector but I thin it's fairly flexible and perhaps you can work around it.
Tom
 

charleyf

Luke Skywalker
Country flag
Offline
If you are not a purist you could get some clear silicon sealer ( comes in a tube). Put a dab in the two holes then put another dab on the pins on the back of the H. Press the H in place and let it set.
But like Hamish I say you can remove the grille screws and pull the grille forward to get access. Your car should have the type of clip shown in Hamish's photo. If they are falling off it is because they have been expanded. Your choice is to try to squeeze them back to original shape or replace them. You may also need to remove the left front overrider to get enough room for large hands.
I just tried to push my hand down past the cardboard wind deflector. It is possible with smaller hands but then you need the length of a larger person. Or you could bend the cardboard a bit to accommodate larger hands.
Charley
 

charleyf

Luke Skywalker
Country flag
Offline
Upon thinking some more about the clips. Only the screws on the sides and upper portion of the grill have those clips from the picture. The bottom screws use a flat spire nut as the bottom of the screw is accessible from underneath the panel. That is if any backing is needed.
Charley
 
OP
TR3Acustodian

TR3Acustodian

Freshman Member
Country flag
Offline
Unless you have the cardboard wind deflector, you can access the H by reaching past the radiator in the engine bay. You don't even need to remove the grille. The push nut is available at any decent hardware store. I use the flat ones.
I've never had that wind deflector but I thin it's fairly flexible and perhaps you can work around it.
Tom
I've got the cardboard deflector. It's pretty rigid too. I'm in Boston MA and I've found no hardware stores that carry these and had to order them through Moss wich is ok. Thanks for the input though.
 
OP
TR3Acustodian

TR3Acustodian

Freshman Member
Country flag
Offline
If you are not a purist you could get some clear silicon sealer ( comes in a tube). Put a dab in the two holes then put another dab on the pins on the back of the H. Press the H in place and let it set.
But like Hamish I say you can remove the grille screws and pull the grille forward to get access. Your car should have the type of clip shown in Hamish's photo. If they are falling off it is because they have been expanded. Your choice is to try to squeeze them back to original shape or replace them. You may also need to remove the left front overrider to get enough room for large hands.
I just tried to push my hand down past the cardboard wind deflector. It is possible with smaller hands but then you need the length of a larger person. Or you could bend the cardboard a bit to accommodate larger hands.
Charley
This is a survivor and not a show princess. Very original. I'm inclined to take your advice about the silicon. It can always be reversed if I decide to do a full restoration. Thanks for the input. very helpful.
 

Popeye

Darth Vader
Bronze
Country flag
Online
I've got the cardboard deflector. It's pretty rigid too. I'm in Boston MA and I've found no hardware stores that carry these and had to order them through Moss wich is ok. Thanks for the input though.
Off topic, however, depending on where in Boston area you live, my favorite hardware store for nuts and bolts is the True Value on Lexington St. in Waltham. Amazing selection, helpful staff. And right down the road are two car parts shops (Autozone and O’Reilly’s).
 
OP
TR3Acustodian

TR3Acustodian

Freshman Member
Country flag
Offline
Off topic, however, depending on where in Boston area you live, my favorite hardware store for nuts and bolts is the True Value on Lexington St. in Waltham. Amazing selection, helpful staff. And right down the road are two car parts shops (Autozone and O’Reilly’s).
Wow!!! I work in Waltham and went to that store to look for them and they did not have spire nuts. Great store though.
 

Leatherman

Member
Country flag
Offline
I would add that even with the press on tabs that hold the letters if not pressed tight the letters will move and rattle on different frequencies. I would up removing my grill and putting a dab of silicone on each tab of each letter. Now my letters don’t move and will never come loose or fall off until I need to remove them. Hopefully I never have to.
 
Similar threads
Thread starter Title Forum Replies Date
KVH TR4/4A Replacing Front Windshield Gasket Triumph 5
M Replacing front shocks, torque setting? Spridgets 2
RJS TR4/4A Replacing front brake hoses Triumph 10
RickB Replacing 12 front bushings today Spridgets 15
J Replacing front shocks. Austin Healey 3
B Replacing Front Seal Spridgets 3
R Replacing Front Hubs and Bearings Austin Healey 8
Whytock Replacing Front Signal Light Lens MG 1
B TR6 replacing U joints Triumph 4
S TR2/3/3A Pinion tail bearing replacing Triumph 12
B Replacing the Handbrake Cable Austin Healey 8
drooartz Replacing Bugeye windshield rubber Spridgets 6
K TR2/3/3A Replacing engine and gearbox mounts? Triumph 8
K TR2/3/3A Replacing water pump pulley.....memory refresh. Triumph 7
I Replacing Windscreen Wiper Wheel Boxes Austin Healey 0
S MGB 1978, replacing the clutch. MG 3
PAUL161 T-Series Replacing Transmission MG 3
S TR2/3/3A Replacing the cam shaft Triumph 27
fpstude TR4/4A Replacing Rear Flexible Brake Hoses on TR4A w/ IRS Triumph 11
J TR4/4A Replacing springs Triumph 7
Got_All_4 TR5/TR250 Need guidance for replacing steering column bushings Triumph 11
L Replacing veneer on wood dashboard Restoration & Tools 14
D TR6 Replacing Horn insert in steering column Triumph 11
69MGC MGC Replacing an Outer Wheel Well panel MG 3
maxwedge5281 Replacing Factory Hardtop Rear Window Austin Healey 24
BN6_2197 Replacing gearbox switch of the overdrive system Austin Healey 10
TomMull replacing walnut veneeron the dash Lotus 17
R TR2/3/3A Replacing rear springs Triumph 51
Jer refresh my foggy memory - replacing clutch in my 67 Midget Spridgets 1
RAC68 Clutch Still Slipping after replacing 30W-Non-Det. for Red Line Austin Healey 52
T Replacing O/D switch with a clock Austin Healey 4
simon1966 Replacing the witches nose in-situ. BN1 Austin Healey 14
Michael Oritt Replacing timing chain tensioner and more Austin Healey 24
Rut Replacing rocker assembly Spridgets 1
T TR4/4A Replacing rear pinion seal - remove driveshaft? Triumph 21
J Replacing BJ7 Dash - Detailed Photos/Schematics Austin Healey 3
T TR4/4A Replacing in situ oils sealing gearbox and rear axle Triumph 18
55modified TR2/3/3A warning indicator bulbs need replacing where and what to buy? Triumph 4
Jim_Gruber Replacing Wheel Studs Spridgets 10
P Replacing the crankshaft damper [harmonic balancer] Austin Healey 15
K TR4/4A Replacing a broken 4A turn signal switch indicator? Triumph 2
55modified Replacing rear spring eye bushings on a BN1. How difficult? Austin Healey 8
Michael Oritt Replacing Cold Air Box with Velocity Stacks Austin Healey 10
Rhodyspit75 Replacing boot floor need bracing? Spridgets 2
RickB MGB 1980 MGB No rear brakes after replacing MC & booster MG 5
Popeye TR4/4A Steering bushing: replacing rubber with poly, do I snug to 1/8" gap or...? Triumph 3
Jim_Gruber Replacing Spridget Coolant Spridgets 21
TimK Old brake hoses need replacing, if you need proof look here... Austin Healey 1
KVH TR4/4A Replacing the Real Axle Tube Seal Triumph 17
KVH General TR Short Wheel Studs for Wire Wheels--Replacing Triumph 17

Similar threads

Top