• Hey Guest!
    BCF is a resource offered at no cost to the Little British Car community. We do not require you to pay to play here. However, if you find BCF helpful, appreciate no pop up ads, and you want to ensure we stay online - Please support us with an "optional" low-cost (less than many car club dues) member upgrade. There are some benefits to upgrading!
    **Upgrade Now**
    (PS: Subscribers don't see this UGLY banner)
Tips
Tips

TR2/3/3A More Heater questions

GTP1960

Jedi Knight
Offline
I've been at this heater problem awhile now, and it still will not produce hot air.
what I've done & verified:
replaced the heater valve and stem under the bonnet. (Leaked a little at the base of stem & I wanted to make sure I had flow)
replaced heater hoses under the bonnet( outflow from firewall to engine pipe, felt soft & was crimped a little)

removed and and flushed the core (flushed out with mild solvent, produced an impressive amount of crud until I got continuos clear water)
i am pretty sure water was flowing thru the core as I could hear it sloshing around in there.
pressure test = no leaks.
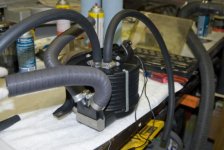
hooked it back up sitting in a Tupperware on the floorboard.
i could feel the inflow hose get warm & pressurize. But not the outflow.

question: is there an designated inflow & outflow to the heater core? Maybe I have the hoses backwards.(pls see pic)
question: is there a step I need to take on the outflow engine hookup.(left side and below thermostat housing)

I was under the impression it was a simple flow thru system, if the heater valve is open.

any advice appreciated.

THX!

Guy
 

Attachments

  • image.jpg
    image.jpg
    74.7 KB · Views: 82
As far as I know there isn't any directional problem. When flushing mine I always go from both directions and typically when you switch directions you get more junk out. Sounds like you aren't getting fluid all the way through. May need to look at the return end at the engine block if it is blocked there you won't get flow. also if you have not done it disconnect the out flow side to see if you get anything out with it running. You'll need to block off the return pipe at the engine side.
 
Guy, I agree with Eric, don't think direction of flow would matter, but I suspect that there might still be a restriction in the heater core. Maybe you could test briefly by having the outlet hose from the heater pass into a bucket just to see how much flow you are getting (with engine inlet plugged)? For reference this is how mine is put together. Cheers, Mike

Heater Components.jpg
 
That pipe on the left of the engine is the return to the water pump. I have seen them become totally blocked, so that is where I would check next.

However, note that the tubes through the heater core are all connected in parallel. That means that, if all but one tube is completely blocked, you'll still see flow from inlet to outlet.

PS, one other point, I had a lot of trouble with ordinary heater hose kinking above the heater when I installed it. The original "ribbed" hoses were also stiffer, I believe, so they would make that rather sharp turn without kinking. Back when I wanted more heat, I went as far as adding copper elbows above the core, to improve the flow. I got to where my right knee would get way too hot, but never did much good as far as heating the rest of the car. Too many air leaks, I guess. Now, the heater sits on a shelf in the garage :D
 
Have you tried putting a clear piece of tubing between the inlet and outlet hoses on the engine / car? This would show you how much flow you are getting from the engine and what would be going through the heater. As well while this is running you can feel how hot the tubing gets. If it does not get very warm, you can not expect the heater to produce heat where little to none is put into the heater.
to increase available heat put in a 180 degree thermostat or during the winter try blocking off part of the grille.
Charley
 
That pipe on the left of the engine is the return to the water pump. I have seen them become totally blocked, so that is where I would check next.

However, note that the tubes through the heater core are all connected in parallel. That means that, if all but one tube is completely blocked, you'll still see flow from inlet to outlet.

PS, one other point, I had a lot of trouble with ordinary heater hose kinking above the heater when I installed it. The original "ribbed" hoses were also stiffer, I believe, so they would make that rather sharp turn without kinking. Back when I wanted more heat, I went as far as adding copper elbows above the core, to improve the flow. I got to where my right knee would get way too hot, but never did much good as far as heating the rest of the car. Too many air leaks, I guess. Now, the heater sits on a shelf in the garage :D


Thanks, All!
Im pretty sure that return pipe was it.
man, it was like concrete.
after I broke thru with a long screwdriver & coat hanger wire, I got after it with a gun cleaning rod/brush.
im going to clean up the outside & re paint before I put it back on.

but now that I've got it all fixed up, I may just put my heater on a shelf too.

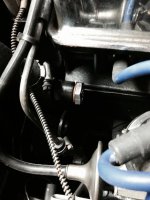
Randall, do you know what size plug would fit that return port? (Or the best way to bypass it)
 

Attachments

  • image.jpg
    image.jpg
    68.4 KB · Views: 77
...Randall, do you know what size plug would fit that return port? (Or the best way to bypass it)

Not Randall - but I can show you how the factory deleted/omitted the heater on my TR4:

The head was plugged with a 45° elbow and pipe plug:

HeaterDelete1_zps91d5e05a.jpg


The water pump also used a pipe plug - sorry no idea what size but looks bigger:

HeaterDelete2_zps1cd71768.jpg


Simple blanking plates were used where the hose fittings would be on the firewall:

HeaterDelete3_zps660d325b.jpg
 
Thanks Geo,
guess I'll stop by a plumping supply tomorrow and try to match a plug, for the water pump housing.
the inflow valve should be ok in the off mode.

thx again.
 
Cant recall what size plugs were, maybe 3/4", but I used just a standard,hardware store, plug with the square head. They come in steel or brass. I sprung the extra 5 cents or so for brass, hoping to avoid some corrosion, plus the brass looks purty. A little teflon tape on the threads helps too. My heater core is on a shelf under the dash.
 
Last edited:
The TR3 "heater delete" was very similar to what Geo shows, except of course the heater was described as an option and no 45 elbow at the head. I'm pretty sure both plugs were the same size (also same as the oil drain plugs on the gearbox and later engines). I think the size is 3/8" NPT, which of course measures closer to 5/8" since pipe threads are sized by the nominal inside diameter of the pipe, but the threads go on the outside.
https://www.mcmaster.com/library/20120625/4464KAC.pdf

Personally, I've got a stack of adapters on the head, with a Schrader valve (so I can pressurize the cooling system with low pressure air, to check for leaks); and the return port on the water pump housing is carrying the sender for the electric radiator fan.
 
Thanks for all the tips.
The oil plug answered:
Mine called for a 3/4"-16.
perfect fit.

Even though muggy SC isn't as warm as sunny southern Cal., I don't think I'll miss the heater, much,
& it sure opens a lot of tinkering space behind the dash.

BTW: that's a great Idea to use that water pump housing port for your fan sender. I would think it gives validity to your thermostat gauge sender( & vice versa), since they are all on the same real estate, so-to-speak.
thanks again.
image.jpg
 
My TR6 heater is worthless as well but since I don't drive in the winter, I don't miss it. The blower motor works fine but no heat comes out.
 
Similar threads
Thread starter Title Forum Replies Date
KVH General Tech Heater and Vent Control Cables--TR2 thru TR4, and more . . . Triumph 3
Brosky More on the heater case rebuilding project Triumph 5
G No More Blown Heater Fuses!!!! Triumph 3
Bayless More Prefect Progress Other British Cars 2
B MGB while driving engine cuts out if I let off or push more throttle it comes right back on MG 5
C MGB More Weber help needed MG 27
DrEntropy More lessons in Japanese engineering Other Cars 7
KVH General Tech More Technical Questions—TR4 Triumph 5
KVH General Tech More Engine Rebuild Questions Triumph 15
AngliaGT A Few More Spotted 6
AngliaGT Saw a Few More Spotted 0
Bob Claffie More Village pics Other British Cars 0
Bob Claffie More Village pics Other Cars 3
M TR6 More noob questions… Triumph 14
Bayless More Paint Other British Cars 3
AngliaGT A Few More Local Vehicles Spotted 5
Basil More BMW Z4 trials Other Cars 21
AngliaGT A Few More I saw Yesterday Spotted 10
SteveTheBrewer Spitfire More rust repair Triumph 1
AngliaGT A Few More along Highway 220 Spotted 3
Bob Claffie More pics from Falls Village Festival Other British Cars 3
Sherlock Another cruise night, more interesting British iron Spotted 2
Y MGB More things that seem odd.... MG 2
D TR2/3/3A More Fuel pump questions. Triumph 10
jlaird MGB More on Bee's status MG 6
AngliaGT A Couple More Spotted 0
tr6nitjulius TR6 TR6 meeting my Demands & Giving Back more! Triumph 2
tr6web TR6 More leg room needed Triumph 5
Got_All_4 For Sale Brake caliper pistons Ceramic Coated and more Triumph Classifieds 0
Nelson No more MG Midgets Spridgets 3
HealeyPassion Getting a bit more space for triple Webers... or EFI Austin Healey 3
K TR2/3/3A Auxillary Carb Return Spring in More BS about TR's. Triumph 0
K TR2/3/3A More pics of Kast Cam Triumph 4
K TR2/3/3A TR3A SU's More Pics Triumph 0
Ripper01 For Sale more TR-6 Used Parts Oct 2019 Triumph Classifieds 0
lbcspinners A- H Frog E: no more Bugeye oil leaks! Austin Healey 4
7 No more Bosch tools for me Restoration & Tools 4
D TR2/3/3A More small nuts [ and studs!] Triumph 2
C TR6 More fun with Lucas Triumph 5
Bayless More Sprite progress finally Spridgets 23
Bayless Even more progress - the Prefect Other British Cars 5
maxwedge5281 one more time.....mirrors! Austin Healey 14
Bob Claffie T-Series More or less TD action MG 0
R More Shroud to Scuttle install Austin Healey 4
Y MGB Answer to a question creates more new questions.... MG 12
K TR2/3/3A Auxillary carb return spring in "More BS about TR,s" Triumph 9
S TR2/3/3A little more door gap Triumph 14
Michael Oritt Replacing timing chain tensioner and more Austin Healey 24
T How to add a bit more realiability/endurance to a stock 1275 engine rebuild? Spridgets 9
D BT-7 tri-carb Two more questions Austin Healey 18

Similar threads

Back
Top