• Hey Guest!
    BCF is a resource offered at no cost to the Little British Car community. We do not require you to pay to play here. However, if you find BCF helpful, appreciate no pop up ads, and you want to ensure we stay online - Please support us with an "optional" low-cost (less than many car club dues) member upgrade. There are some benefits to upgrading!
    **Upgrade Now**
    (PS: Subscribers don't see this UGLY banner)
Tips
Tips

TR2/3/3A Parking light fun - TR3A

NutmegCT

Great Pumpkin
Gold
Offline
I noticed my left front parking light wouldn't come on. Right front was okay. Turn signals okay.

Opened the cover, tested the bulb - okay. Tested the double connector inside the bulb holder - not okay. Plastic base was broken, so one of the two connectors (I assume the parking light circuit) actually was touching the ground (base).

I pulled the unit to replace, and realized I hadn't marked which wire was which. Of course, all three are red, connected to the harness with wire nuts.

So I used my multimeter to try to figure out which wire was which. Pulled on the parking light switch, right front parking light comes on. I connected one multimeter lead to the bumper (ground) and the other lead to one of the red wires.

The multimeter showed 12 volts - but the HEADLIGHTS came on also. And stayed on even after I removed the multimeter leads.

I turned off the parking light switch, and the headlights (and right front parking light) went off.

Pulled on the parking light switch, the right front parking light and both headlights came on.

Pulling the light switch to the second notch (headlamps) changed nothing, returning to parking lights changed nothing. Only pushing the parking light switch full in (off) turns off the parking light and headlights. Ignition key is off.

As I also discovered my new parking light unit won't accept the old glass cover and chrome bezel, I'm not a happy camper right now. Are there some front parking light units which won't accept the Lucas glass cover and bezel?

Is there a secret chant I can utter to remove the headlamps from the parking lamp circuit.

Argh.

Tom
 
I can't offer any advice, but I can offer sympathy. I've spent several hours trying to figure out what the heck is going on with the front lamps on my TR3A. They do all kinds of weird things that seem to clear up as soon as I try and diagnose them with a multimeter.
 
I don't have a good TR3A wiring diagram handy, but it sounds as if the main lighting switch is wired backwards or otherwise incorrectly. It should not activate headlights until the second pull.

As to the lamp, what is the base itself made of? Sounds like it's just plain wrong and not an original Lucas L594 lamp, which should be metal. Or just the rubber boot is wrong? Hard to say without seeing it. And the lamp should really have a red (lighting circuit) and a green w/red wire for the flasher circuit...and probably a black ground wire. Again, without a reference handy, I don't remember if the wires from the harness to directly to the lamp connectors or if there was an "intermediate" harness for each lamp; I'm guessing the former was original?
 
From memory, there are two three-way isolated Lucas connectors just behind each horn. Each has a blue-red, and a blue-white for headlights and the third connector is for the parking lights. The blinker connection is off the 4 wires (Lt flash, Rt flash, horn, ground) from the steering harness on the driver's side also next to the horn. All grounds are on the inner fender on each side. Check for 12V at the three-ways to determine which is which as you work the dash switch.

When I replaced the rubber boot, I was suprised that there is no metal lamp socket but it is built into the boot, attached to the grille with a couple of round-head bolts. The chrome ring works around the boot to hold in the glass but only the boot is actually bolted to the grille. The rest is just held by the rubber lip. Again, from memory so YMMV.
 
Just to help filter these data - the headlamps were working fine (only lighting on the second "pull" of the switch) until I removed the parking lamp assembly.

I turned on the parking lights (first notch of switch). When I put the multimeter on the harness leads, the m/m read 12 volts, and at that same moment the headlights came on. And now stay on whenever the parking lights are on - even tho' the m/m is no longer connected.

Tom
 
Aloha Tom,

The wires leading to the left front parking lamp/turn signal should be "red" to the parking lamp and "green/red" to the left turn signal. There should also be a connection for a "black" ground wire.

The two position head lamp switch should have a "brown/blue" wire as the power source connected to the "A" terminal. A "red" wire at the "S1" terminal which passes the power to the parking lamps and dash/gauge illumination lights. The "S2" terminal has a "brown" wire that leads to the "dipper switch" (High/Low beam switch).

There may be problem internal to the switch, causing the "S1" and "S2" to be closed on the first pull. You can remove the switch and test it using the Ohmmeter on the multimeter.
 
Ok, so you've got a failure somewhere, and someone has replaced the wires to the front lamps with non-original (all red) wires. I think some detective work is in order, to locate both the failure and the DPO-isms.

I would probably start by progressively disconnecting front lamps at the bullet sleeves behind the horns, until the other headlight goes out with the headlight switch at it's first notch. If you wind up with only the headlight and it's still lit, then the problem has to be farther back, like at or in the switch. (I'm assuming you know your switch ... some of them are worn/broken so they will pull out to the headlight position in one motion.)

Here's a schematic that may be helpful. If your car has the dimmer for the dash lights, that area will be slightly different, but AFAIK everything else should be right.
 
Andrew Mace said:
As to the lamp, what is the base itself made of? Sounds like it's just plain wrong and not an original Lucas L594 lamp,
The original lamps have a plastic, bakelite-like center inside the metal shell, which carries the actual contacts. Hopefully it's obvious that the socket can't ALL be metal <G>.
And, like Tom, I've found several of them broken. Although more often for me, it's the two contacts that short to each other, rather than one to ground.<div class="ubbcode-block"><div class="ubbcode-header">Quote:]Again, without a reference handy, I don't remember if the wires from the harness to directly to the lamp connectors or if there was an "intermediate" harness for each lamp; I'm guessing the former was original? [/QUOTE]Should be effectively a sub-harness between the lamp body and the bullet sleeves near the horns. However, the SPC I have handy doesn't show it supplied separately, only as part of the lamp assembly.

And it does seem that many people are tempted to cut the sub-harness right behind the lamps. Must be simple ignorance, since it's surely easy enough to pull the bullet connectors loose, and lift the subharness out of it's clips on the inner fender (under the apron).
 
I'll second Randall's point about sub harnesses between the lamps holders and the main harness. There should be a a harness (four total) between each of the head lights and each of the parking/turn signal lamps back to the main harness. The connections all are behind the horn on each side of the car. Hopefully, Tom can find correctly color coded wiring at that point.
 
As the headlamps didn't come on until I touched my multimeter leads to those harness wires ... is it possible I somehow "fused" a circuit closed?

I can't see the problem being a switch or a mis-wiring, as the headlamps (and the working parking light) were working correctly before my multimeter attack.

T.
 
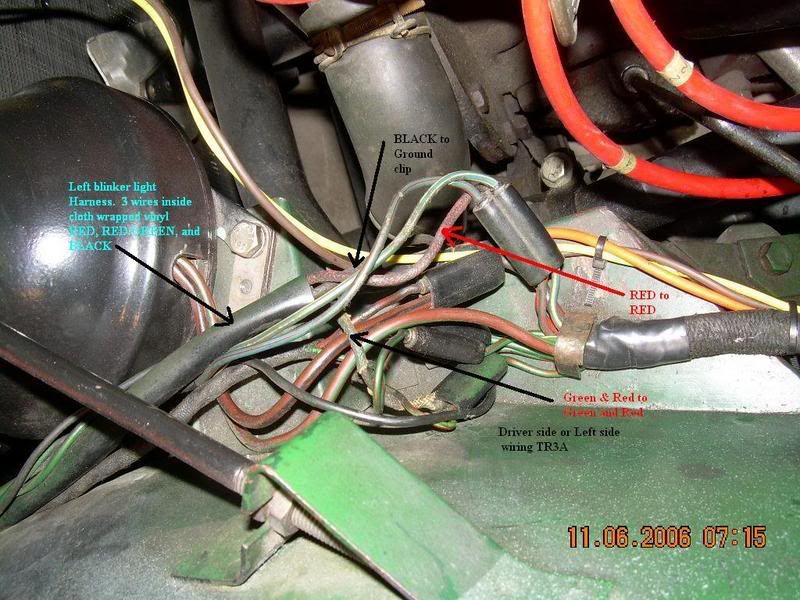
Here's a picture.

tr3awiringleftside.jpg
 
PeterK said:
...When I replaced the rubber boot, I was suprised that there is no metal lamp socket but it is built into the boot, attached to the grille with a couple of round-head bolts. The chrome ring works around the boot to hold in the glass but only the boot is actually bolted to the grille. The rest is just held by the rubber lip. Again, from memory so YMMV.
I'm confused! Every original L594 lamp I've ever dealt with had a metal base that covered most of the boot; it is through that metal base, and then through the rubber boot, that three screws hold the lamp to the grille (or bodywork in other applications).

Meanwhile, thanks to "MGTF1250Dave" for pointing out the correct color code for LH flasher circuits. I'd misread RH before. I did go back and correct my earlier post so as not to confuse future readers of the thread. /bcforum/images/%%GRAEMLIN_URL%%/wink.gif
 
NutmegCT said:
As the headlamps didn't come on until I touched my multimeter leads to those harness wires ... is it possible I somehow "fused" a circuit closed?
I think it's more likely to be coincidence, but I guess anything is possible. Logically, the only place those circuits get near each other is at the dash switch, and near the horns.

What happens if you switch beams with the foot switch ? If the beam doesn't change, then the short is likely near the horns. Otherwise, it's likely near the switch.<div class="ubbcode-block"><div class="ubbcode-header">Quote:]I can't see the problem being a switch or a mis-wiring[/QUOTE]Just as an example of what can happen, I had an intermittant short in the high-beam wiring for a long time. One of the bullet connectors was improperly installed onto the subharness wire, with a single strand of wire poking out; which would sometimes touch the ground clip (except of course if I was looking for the short).
 
My experience with the Lucas lamp is the same as Andrew's. I recent bought a replacement and was disappointed in its construction.

The originals had spring loaded brass pins that were the contacts inside the bulb holder and wire connection terminals at the rear of the lamp. After pulling the rubber boot off the lamp holder, the wiring was feed through holes for that purpose up to the lamp. I can't recall if you pull or push the spring loaded connector, but one of those actions opens a hole were the wire is inserted and is secured when the pin is released.

The replacement lamp had thin sheet metal roll formed pieces that were easily distorted when a bulb was inserted. In one instance, the contact twisted out of position and grounded the lamp base. I was able to salvage the brass bits form my old lamp and install them in the new one.

Accidentally grounding a circuit like the head lights when it is powered can cause arching, sparking and smoke. The common points where both the head lights and the side lights circuits meet are at the switch and behind the horns. What used to work, may not be working after the accidental grounding.
 
Andrew Mace said:
[I'm confused! Every original L594 lamp I've ever dealt with had a metal base that covered most of the boot; it is through that metal base, and then through the rubber boot, that three screws hold the lamp to the grille (or bodywork in other applications).

I did say from memory. I just remember getting the rim and lense to fit in the lip was a bit of a pain. By now I think about some more, I guess there is a metal base inside the boot, three screws ... You're absolutely correct.
 
Here's a the old lamp and the replacement. You can see the broken connector from the old lamp. Both have metal bases.

Lots of wiring adventures ahead today. I also discovered that the spare bezel didn't quite accept the glass lens; the lens doesn't fit smoothly through the ring. Hopefully using the original bezel will clear up the fit problem.

Two pictures - one small, one high resolution.
 
Hmmm, I only see two old lamps ?

The glass doesn't have to fit through the bezel; since the glass gets installed first. The bezel fits over the glass.
 
The glass on mine { A little earlier style but basically the same other than a flat lense rather than coned} sits in the rubber and the chrome bezel is what holds it in place. Getting the bezel in the groove on the rubber is a feat in itself.
AND yes I too am looking for ONE O.E.M. park/turn light assembly. The rubber boot is badly torn and the bulb holder is toast.
Kerry
 
AweMan said:
Getting the bezel in the groove on the rubber is a feat in itself.
A small flat-blade screwdriver, with the corners not too sharp, makes it really easy. Push the bezel into the rubber slot at one point, then use the screwdriver to lift the rubber lip away as you push the bezel down at the next point. Slide the screwdriver around and continue pushing the bezel under the lip. Does take some practice at first, but once you learn the motion it only takes a second to do the whole thing.<div class="ubbcode-block"><div class="ubbcode-header">Quote:]AND yes I too am looking for ONE O.E.M. park/turn light assembly. The rubber boot is badly torn and the bulb holder is toast. [/QUOTE]Perhaps I'm missing something ? The bulb holder is totally hidden, so an aftermarket holder should be fine. And AFAIK the rubber boots (even the longer ones for the TR2/3 lamps) are readily available ? TRF P/N LU52240 listed @ $27.
 
MGTF1250Dave said:
My experience with the Lucas lamp is the same as Andrew's. I recent bought a replacement and was disappointed in its construction...The replacement lamp had thin sheet metal roll formed pieces that were easily distorted when a bulb was inserted. In one instance, the contact twisted out of position and grounded the lamp base. I was able to salvage the brass bits form my old lamp and install them in the new one.
Dave, Kerry and others: Holden in the UK shows on their web site what looks to be a pretty good-quality L594 double-filament lamp base. And as Randall noted, new rubber bodies are readily available from TRF and other US suppliers. I don't know what the US suppliers might sell for replacement lamp bases....
 
Similar threads
Thread starter Title Forum Replies Date
C Parking Light/Tail Light Problem Triumph 5
D TR2/3/3A wiper motor parking? Triumph 17
TomMull TR2/3/3A Parking brake: Lesson learned? Triumph 8
D Parking Brake Adjustment Austin Healey 2
M Windscreen Wipers Parking Spridgets 4
tr6nitjulius General TR TRIUMPHest 2019 Register# Reserved Parking Space# Triumph 0
J For Sale Triumph tr6 tr250, tr5 parking brake improvement kit Triumph Classifieds 1
G TR4/4A Front Parking Lamps Wiring Question Triumph 5
S TR2/3/3A Wiper Motor Parking Question Triumph 8
TomMull TR2/3/3A Parking brake cable length Triumph 3
K TR2/3/3A More electrical....parking lights?... Triumph 2
B Mini Windscreen Wiper Parking British Motor Corp 3
T TR2/3/3A wiper motor parking Triumph 7
Patrick67BJ8 1967 Phase-2 BJ8 - Front parking & turn signal lights alignment Austin Healey 8
RickB All 4 parking lights dead, fuses all good? Spridgets 6
T TR2/3/3A TR3b parking lamps Triumph 2
wingsandwheels TR6 TR6 wiper motor parking Triumph 1
T T-Series TF Parking Brake Disassembly Advice Needed MG 2
O TR2/3/3A TR3 Headlite Trim Rings and Front Parking Lite? Triumph 10
JPSmit Parking garage spot - REALLY lousy pics Spotted 6
J TR2/3/3A tr3 notchy steering in parking lots Triumph 12
PatGalvin Parking Brake Rebuild Triumph 5
Brooklands Seen in the public parking garage in St Augustine Jaguar 4
Morris OT: Spent the night in a parking lot... Spridgets 2
tweety Parking Brake Adjustment Spridgets 3
B How to install tail and parking lights?? Austin Healey 10
M Wipers parking in the Up position Spridgets 11
D Front parking lamps and side markers? Triumph 10
Newkie Parking and Headlight problems MG 8
PeterK Well, the parking brake works ... Triumph 12
Dadandson Adjusting the Parking Brake Spridgets 12
tony barnhill Harbor Freight Parking Lot Sale... Restoration & Tools 27
Aeroken Parking Brake Cable Triumph 6
19_again bright parking lights MG 6
V 1969 Mini Parking Lights British Motor Corp 6
jjbunn Windscreen Wiper Parking MG 10
fmichaels 67 parking/turn signal lights Spridgets 8
10musketeer Hmm. Parking Lights Spridgets 4
Russ Austin Wife's not happy, No parking space! Triumph 8
W Parking Lights Spridgets 12
J Hand brake/ Parking brake MG 6
J Parking lot races Triumph 15
Bruce Bowker Parking lights Other Cars 12
A parking break? MG 2
J For Sale TR 3 dash warning light lens, used Triumph Classifieds 0
D TR2/3/3A 3D printed tail light Triumph 12
B For Sale GT6/Spitfire License Plate Light Assembly Triumph Classifieds 0
B Positive-Ground LED Light Strip Austin Healey 8
bigjones TR2/3/3A Rear tail light not budging Triumph 5
jfarris TR2/3/3A Light show in the turn signal indicator bulb Triumph 2

Similar threads

Back
Top