• Hi Guest!
    If you enjoy and benefit from your participation at British Car Forum, please consider supporting our efforts with a subscription.

    There are some perks with a member upgrade!
    **Upgrade Now**
    (PS: Subscribers don't see this banner)
Tips
Tips

Over arched Moss Motors leaf springs for Sprite MkIII

S

slacsteve

Guest
Guest
Offline
Over arched [Not - springs OK] Moss Motors leaf springs for Sprite MkIII

I bought standard replacement springs from Moss in Jan 2012 to replace my broken left and ok right rear springs. They came with 2 inches greater arch compared to the right good one (47 years old).
Moss technical said that shouldn't be a problem. Struggled for 3 days and finally got them in after removing the rebound straps and the exhaust pipi and muffler. Back on the ground there is no way the straps will go back on and the muffler will have to mounted farther from the chassis. Seems to me the have to be "rearched". Not sure how that gets done. Anybody with similar experience. Do I need rebound straps? Also the shackle is horizontal up against the underside of the trunk box. Addendum 7/17/2013: the springs are fine. I somehow finished the spring installation with the shackle held horizontal and tight up against the chassis preventing the spring from compressing. It was easy to coax it down past 45 degrees from horizontal and from there the spring lengthened under compression and pushed the shackle to vertical as it should be. Moss 265-490 works on early square body sprites like my '66 MkIII.
 
Last edited:
I did both sides of a 73 Midget about 2 years ago and I used Moss springs. The new ones do have more arch than ones that you take off. I also had one broken spring. The rebound straps went back on but the axle has to be jacked up some for straps to go on. Once I had the car on the ground the rear of the car is only slightly higher than the front. The shackle being horizontal against the underside of the trunk is not right. Is the spring end of the shackle closer to the rear wheel or swung around the other way towards the rear bumper?
 
Thanks for replies. The over arched springs are of course short eye to eye due to the extra curvature (about an inch) so the shackle is flat up closer to the rear wheel. Lowering the car to put full weight on the wheels/springs does not compress the springs enough to attach the straps - still 1 1/2 inches short. The springs have both sticky labels and painted-on labels that indicate the spring are correct for a MkIII. Of course the factory may have grabbed the wrong springs and mislabeled them. If someone has a proper spring off the car I would like them to measure with the spring standing on the floor (upside down) to the middle leaf at the highest point. My old spring measure 6 inches and the new one measures 8 inches. Anybody know where you go to get spring "re-arched"?
 
Make sure you have the correct end forward. Are your wheels centered in the wheelwell? If not you have the springs backwards. First indication of a problem was that the straps would not connect no matter how I tried. Don't ask me how I know this... :rolleye:
 
the shackle is flat up closer to the rear wheel.
I think it is backwards and should be flipped. The spring end of the shackle should be angled towards the rear of the car.
 
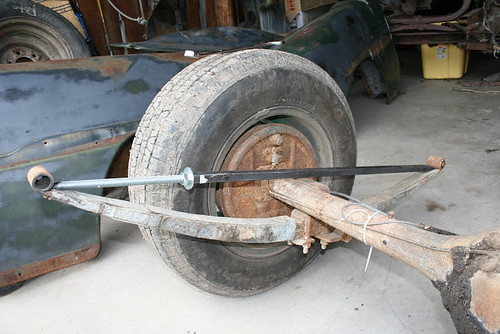
To make replacing leaf springs easer, I always use a spreader bar. You can make one from hardware store parts. A piece of all thread, a length of pipe and a nut for the all thread. Flatten the pipe on one end, grind a wedge on one end of the all thread and your ready to spread the spring. Here's a general photo of what one looks like. PJ

PS, I use a 5/8 all thread and a piece of pipe it'll slide into.

Not my spreader! Just an example. He used square tubing.
 
Try this, put the car on stands and jack just one side of the diff up under the spring plate. Do one at a time. I had trouble with mine and that's how I did it more or less. You'll have to support the other side up against the body with a stand or blocks to keep the diff up and level.
 
I just happened to have some springs I took off a car at the junk yard. They still have the sticker on them with part no. 265-490. Upside down, they measure 8" from floor to the top of the uppermost spring, if that helps.
 
The problem with measuring old springs is they have been compressed for who knows how long and may not have the same unloaded arch as new.
 
So i took her of the jacks and drove around. Pretty poor performance.
1. Very bouncy but what did I expect replacing 47 year old springs with new ones. Can't help but think the excessive arch contributes to this though. Need to check the shocks also.
2. Re PHerder: the springs have a press-fit bushing which is shown in the Moss diagram as the front (non-shackle end). That's they way mine are.
3. Trevor: flipping the springs would not change the forward/horizontal position of the shackle. The distance between the two eyes is unchanged. I don't see how the shackle can move rearward without re-arching to stretch the eye to eye distance.
4.Paul161: spreader is interesting but given the way the shackle rotates when you remove the sperader the shackle moves forward to my current position.
5.kellysguy: What i did was get the first ubolts started and screwed down. The second setis harder. I bought two 4 inch C-Clamps and squeezed the axle down against the springs until I could get the 4 nuts started.
6. 1974Midgetguy: Thanks for measurung that 8 inches. Same as I got so that is what Moss is delivering. Same part number etc.
7. kellysguy: Yes I just may be accustomed to old soft springs and worn shocks as my standard of performance.
I will attach a couple of photos: Yes I need air and tires. You see that the car is up a couple of inches( car is on a sloping driveway). Tires seem to be centered and nothing is close to rubbing.
So i've got my work cut out. Will report back as I progress.
 

Attachments

  • photo 1.JPG
    photo 1.JPG
    83.5 KB · Views: 128
  • photo 2.JPG
    photo 2.JPG
    84.5 KB · Views: 128
I'm not sure about Calif., but here in New Jersey, most truck-repair shops can re-arc springs. The only problem is getting them to get the correct arc since it may be somewhat trial and error. You can re-arc the springs yourself with a bearing press if you are patient. Actually you can even hand hammer them in a flatter arc, but it's a lot of work. I made a simple fixture to re-arc my springs. You can see details of what I did here: ----> https://www.britishcarforum.com/bcf/showthread.php?63122-Leaf-Spring-Re-Arc-fixture&highlight=spring
 
Slacsteve, I'm afraid that with your shackles in that position you are getting NO spring action. If you can't unbolt the shackle and reposition it so that it can swing through a arc you will have to have them rearced. I'd be raising H##l with Moss. Shawn or someone from there is usually monitoring this forum. Those springs IMHO are completely unacceptable or installed incorrectly. Perhaps if you unbolt the axle again and place a lever at the juction of the spring and shackle you can pop them down so that they will swing through an arc.
Finally, do not throw your old springs away. I had a bad experience with a set of springs for a MGB a few years ago and since them I have been rebuilding mine. Usually the only thing that makes them sag is the fact that the plastic spacers between the leaves has worn and that is what I replace.

Kurt.
 
Good point on the spring action. I will call tech support at Moss. I don't believe I can pop the shackles down as the over arched spring is too strong and held in place by the front hinge and the axle. Freeing up the axle would allow some motion but reattaching it would slam it back up again. There is nothing to make it stay. The fact is the eye to eye distance of the spring is one inch shorter than my old one.

I saved the old ones. One has a broken leaf. One option is to pursue the rebuild. Re-arching the new ones is the other.

I think I now know why 1974Midget found a sprite in the junk yard with new springs on it!
 
Last edited:
I'm not sure about Calif., but here in New Jersey, most truck-repair shops can re-arc springs. The only problem is getting them to get the correct arc since it may be somewhat trial and error. You can re-arc the springs yourself with a bearing press if you are patient. Actually you can even hand hammer them in a flatter arc, but it's a lot of work. I made a simple fixture to re-arc my springs. You can see details of what I did here: ----> https://www.britishcarforum.com/bcf/showthread.php?63122-Leaf-Spring-Re-Arc-fixture&highlight=spring

Ingenious Nial! Strong, very portable and easy to store on a shelf. :encouragement: PJ
 
Foothill: That would be great if you have the second most outer (curvature-wise) leaf. I have the out shorter one. inter-sheets look ok. I don't know how to do the wrap though. Perhaps you could guide me. See pix. I would be happy to compensate you.
 

Attachments

  • photo.JPG
    photo.JPG
    158.1 KB · Views: 121
The plastic I used is from McMaster Carr and was Moly filled.....something. Escapes me right now but not Nylon or Polyethelene.

I'm currently running a 6 leaf 1275 spring on the drivers side and a 5 leaf 1098 spring on the passengers side of my datsun midget. If you remove the center spring bolt you can weasel the spring clamps off the ends of the leafs.

Kurt.
 
Thanks nomad, I'll try that.

Anybody know if I can just weld the broken leaf together and reassemble. I would imagine that that section of would be annealed ( not so springy). Maybe I could re-temper it in oil and then heat it up cool it slowly to avoid it being brittle.
 
:redface-new:QMG! These springs do work! I talked to Moss Tech Support again and he suggested I try to pry the shackle down (as someone else suggested here). I didn't think it would work. He said the weight had to be off the springs. I wasn't sure but dutifully went out but didn't think I could get them down to 90 degrees. But as I tried they were easy to move to 50 or so degrees from horizontal when I ran into resistance and then I realized that past 45 as the springs compressed under the weight of the car they would lengthen and push the rest of the way. That's exactly what happened. My apologies to all who suggested this for not doing it earlier:stupid:. The car is no longer two inches high, no daylight above the tires (lack of spring compression kept the car high). The rebound straps are close but not attached yet. I will drive for awhile and see if the springs don't settle. The performance of the car is fine now. I can put my exhaust pipe back up where it belongs. Thanks to all for helping me with the journey. Steve. Update, after a few miles the rebound straps are connected. Yeah!
 
Last edited:
Similar threads
Thread starter Title Forum Replies Date
jaegzie Searched, no luck...What does HP on cars stand for Spridgets 20
jaegzie Ive searched/cant find thread master cylinder BE Spridgets 6
CJ Burton MGB Moss has a sense of humor MG 0
Scotsman TR4/4A Moss seat covers for TR4A missing spring tensioner pocket Triumph 0
Frameman 1949 New Moss Motors Fuel Tank Austin Healey 10
SNClocks Moss Motors 5-speed install in a Bugeye Sprite Spridgets 2
shadowfever Moss Motors MG Midget seat covers Spridgets 6
Celtic 77 MOSS response issues Restoration & Tools 11
BoyRacer Moss Motors Center Consoles Austin Healey 0
T TR2/3/3A Moss uprated water pump Triumph 6
C Alternative to Moss's BMC Green Engine Paint Austin Healey 10
M TR2/3/3A HVDA Replacement Clutch Disc Available from Moss Triumph 10
S TR2/3/3A Moss Motors Vitesse 5 Speed Conversion Kit Installation Issues Triumph 13
vette Latest Moss Motors Magazine Austin Healey 1
D MGB 3 Main bearing 1800 & Moss Supercharger MG 1
Basil MGB Moss Motors MGB - Jay Leno's Garage MG 3
K TR2/3/3A Moss Improved performance camshaft 851-051...... Triumph 0
BJ8Healeys For Sale Midget/Sprite nose section - used [Moss Motors P/N 455-145] Spridgets Classified 0
J For Sale Triumph TR2 TR3 TR3A New Moss Motors Black Karvel Style Carpet Kit Triumph Classifieds 0
3798j General TR Moss Motors acquires Victoria British Triumph 10
J TR6 Moss HS6 SU conversion kit question Triumph 4
steveg TR6 Moss advance kit maximum advance question Triumph 13
K TR2/3/3A Coil nuts? The SW and CB nuts on a Moss gold coil? Triumph 3
Upland Moss build-a-paper car contest Spridgets 1
K For Sale Front cockpit dash rail...N/A at Moss Triumph Classifieds 0
BLong63AH Moss Supplemental Heat Shield Austin Healey 2
Jim_Gruber In need of 2 Fulcrum Pin Bolts - MOSS Has them on Back Order Spridgets 3
Carlos TR4/4A Moss rear spring distance piece 674-560 Triumph 16
JPSmit Stirling Moss - Sebring Sprite Spridgets 3
KVH TR4/4A Door Seals: Moss Part 249-607 Triumph 0
Simmo TR6 Moss Seats Triumph 0
K TR2/3/3A Installing Moss wheel spacers? Triumph 5
E Moss stainless exhaust offering. Austin Healey 28
R TR2/3/3A New Control head wiring - Moss purchase Triumph 1
Michael Oritt Moss Motors rear brake "set" Austin Healey 11
K TR2/3/3A Moss Europe has restored the Jabbeke TR2 Triumph 0
Jim_Stevens For Sale Pair of chrome tail lamp bases, NIB, Moss 159300 Triumph Classifieds 0
LarryK Moss Motors buys XKs Unlimited parts house. Jaguar 6
P Moss Motors front brake calipers [BJ7 to early BJ8] Austin Healey 8
K TR2/3/3A The "compensator bar" on the Handbrake...#53 in Moss diagram Triumph 5
Jim_Gruber New MOSS Tapered Front Wheel Bearings - WTH are the instructions Spridgets 16
GTP1960 TR2/3/3A Moss Crankshaft pulley failure Triumph 23
L 100/ Moss Heat Shield Austin Healey 2
mt10flyer TR2/3/3A Moss Steering Rack Conversion Triumph 26
Jim_Stevens TR2/3/3A Goodridge SS brakelines from Moss Triumph 3
R Moss permanently lubricated U-Joints Austin Healey 1
S For Sale TR6 New Moss 73-76 Seat Foam Kit Triumph Classifieds 0
M TR2/3/3A Fitting on Moss Brake/Clutch Masters Triumph 16
D TR2/3/3A Moss alternator kit Triumph 8
croz TR2/3/3A Moss Replacement front disc pads Triumph 3

Similar threads

Back
Top