• Hi Guest!
    You can help ensure that British Car Forum (BCF) continues to provide a great place to engage in the British car hobby! If you find BCF a beneficial community, please consider supporting our efforts with a subscription.

    There are some perks with a member upgrade!
    **Upgrade Now**
    (PS: Subscribers don't see this gawd-aweful banner
Tips
Tips

TVR 2500M Triple Weber 40 DCOEs

I still can’t get these auxiliary Venturi’s out (or are they chokes?). They are the inner ones. It sure looks to me like these little white caps are covering up some kind of retaining screw / feature.

What are the two little brass caps called? The caps cover two brass rectangular blocks with little check balls below them.

They weren’t in my video….

8526CB1A-B2C3-4742-A3E7-CE1050A4B71E.jpeg
 
Last edited:
Holy carp! Someone has REALLY (expletive deleted) those carbs! Third photo shows an air corrector jet in the top tube where a MAIN JET should be. Check the seats of the idle jet screws, look for cracks in the body of the carbs from an over-tightening of those screws.

"Spanish" Webers were what the emissions regulations resulted in. My take on what you've got is that it's a genuine mess. Not sure how to sort it.

The choke pistons really don't have much to do with the overall operation.
 
What are the two little brass caps called? The caps cover two brass rectangular blocks with little check balls below them.

They weren’t in my video….
Those are accelerator jet circuit check-valves. Hit the throttle and those check-balls allow fuel to go into the jets.
 
Yet again here I am late to the party, time to play catch up. First off, agreed, looks someone has been in there that shouldn't be allowed to play with anything sharper than a Vienna sausage, wow. Now to try and be helpful.

Going back in the thread, from the pictures in post #36, you have the aux venturis out. In post #39 under the category of "Now for the part you will not want to hear," I had mentioned that I have at times run across DCOE venturis that did not want to come out easily. It was then mentioned how you could use a dowel to hold the throttle plate open and using another towel and a small hammer to apply "love taps" to the venturi to shift the venturi a bit so it can be removed. There is a bit of an shoulder on the venturi that you tap against. Using the wood and not getting ham fisted with it will get the venturi out without any damage. You may be at that point.

Finally, the screw at the bottom of the Sharpie in your picture would be the progression circuit hole cover. On the idle mixture screws, hopefully the carb body was not damaged. In any event, those idle mixture screws will need replacing if the carb is salvageable. Good luck as you continue work on your project.
 
Thanks for the help.

I agree that I’m finding some nutty stuff, and some poor workmanship, but I’m not gonna throw all this hardware away…. It ran pretty well before this project began!

It’s gonna get cleaned up and straightened out.

1) Any suggestions on what Locktite to use on my (new) throttle blade screws?

2) What’s a good method (and solution) for soaking small parts like jets to try and clean them? I don’t want to poke anything in them…


Rocky
 
Thanks for the help.

I agree that I’m finding some nutty stuff, and some poor workmanship, but I’m not gonna throw all this hardware away…. It ran pretty well before this project began!

It’s gonna get cleaned up and straightened out.

1) Any suggestions on what Locktite to use on my (new) throttle blade screws?
I would suggest the Loctite 222 purple low strength thread locker. If you can find it, Henkel also has a Loctite primer/activator, SF7649, that I like to use when applying the tread lockers. For pre-cleaning prior to primer and thread locker application, something that will flash off and get rid any oils, along the lines of acetone. There's other stuff that works well too but for various reasons such as environmental or health reasons I just can't recommend any of the benzene ring containing compounds or chlorinated fluorocarbons anymore unless you have a well contained use environment and some really good personal protective equipment. Wear gloves for the cleaning and do it in a well ventilated space.


> LOCTITE 222MS <
2) What’s a good method (and solution) for soaking small parts like jets to try and clean them? I don’t want to poke anything in them…


Rocky
I was always partial to the Berryman's Chem-Dip but again, the original formulation is one of those "this stuff is not good for you" since it is both chlorinated, at least it is one of somewhat more benign ones, and chromated with one of those nasty hexavalent chrome compounds. Use of really good PPE is a must with this stuff. They have a newer, more consumer oriented version of Chem-Dip available in a more reasonable size and it comes with the dipping basket, you don't have to purchase it separately. I have no experience with this newer formulation, just that rather evil original formulation before we got all caring and sharing and didn't really care that we were slowly killing ourselves.

To paraphrase a line from an old Steppenwolf song, here's the original " it's evil, wicked, mean and nasty, it'll kill all the grass Sam" stuff:


And here is the caring and sharing stuff, first the 49 state formulation and then the CA compliant formulation:

> Berryman® Chem-Dip® Carburetor Parts Cleaner - Berryman Products <

 
I’ll get back to you after I get back from LeMans Classic and start putting these bad boys back together…

43C48DFA-DA67-45D4-A3BA-041C3B1A741B.jpeg


Rocky
 
Good for you, Rocky! Enjoy the event.
 
Here’s a question for you guys…. Why are there two “slightly different” top cover gaskets in these kits, and which one is better to use?

And why is the needle valve base 10mm when all the nuts on the throttle shaft, etc. seem to be “standard”?

Thanks!

Rocky
9A3B6F96-7C24-40D0-9ECC-D87DAE9D18F8.jpeg
 
Last edited:
The one you have on the cover plate is likely correct for the Spanish version, the left one for the older Italian body.
 
Thank you, sir. It seems like the cooler of the two gaskets anyway!
 
Got it running, but….

Gas is dumping out of carb 1/2.

Fuel float set incorrectly?

Fuel pressure too high?

Both?

Rocky
41E1AF91-BC89-4F08-A215-21081EA8FEBE.jpeg
 
If the other two aren't showing fuel leak, the float level or float itself should be checked first (tho I suspect you were thorough with that) and p'raps there's something keeping the needle from seating. Any small contaminant in the needle valve can do that.
 
I concur, I would look first at the needle and seat. I wouldn't 100% rule out float level but given everything, probably not it.

Do you have a feel for what kind of fuel pressure you are seeing at that carb? They don't like a lot of pressure, we're talking very low single digit psi type numbers. If you are dumping fuel at the first carb in the run, it could be that your fuel pressure is borderline too high and there is enough of a pressure drop there to keep the others from overflowing.
 
I’ll do that.

I have a fuel pressure regulator in the system, but I don’t have a good knowledge of what it’s set at.

I’m agreeing with what you guys, most likely something to do with the needle and seat, maybe brought on by float adjustment maybe not….

traveling for a few days, so I’ll be back in touch soon.

Thanks -

Rocky

PS…. Very glad to get the car running and starting…
 
So here’s a little more news.

I backed off my fuel pressure regulator screw 3/4 of a turn.

The carb seems like it’s dumping a majority of the fuel out AFTER the engine is stopped.

Taking the jet cover off the top and poking the dipstick down as far as I can go makes it look like the bowl is empty.

The majority of the gas comes out of barrel number two, but about a quarter dribbles out of barrel number one. Maybe that’s because the car and engine are on a slight angle, but maybe not.

It would seem like to me that very quickly after the engine stops running, the pressure would bleed down and the gas leak would stop if it was just the needle or seat.

I’m wondering what could allow gas to drain from the BOTTOM of the bowl? Anything? One of the accelerator pump check balls not seated?

Thanks -

Rocky
 
To my mind pressure is not the issue, rather gravity. Only circuits in the body of the carb low enough to empty the reservoir without vacuum (ie: engine running) are the check-valve and the two open ports supplying the choke circuits at the bottom of the bowl at the back.

I'd bench it. That check-valve and the choke pistons would be primary concern. Are the choke pistons firmly held down by the external spring on the plate for the cable? I've also seen the tines on the brass gears holding choke pistons down broken off from pulling the cable too hard, when the pistons stuck from disuse.

Those are my first-blush impressions. P'raps Ty has some insight I've not considered.
 
I hate to take it apart again, but I doubt it will fix itself….

Thanks for the suggestions.

I checked the choke functionality, but it’s hard to verify the check-ball function…
 
Time to go to the bench with it, but first a couple of questions. When you say "The majority of the gas comes out of barrel number two, but about a quarter dribbles out of barrel number one." is it coming out of the main throat or somewhere else on the carb? If somewhere else, where? The other thing, if we go back to post #59 you had a picture of a couple of emulsion tubes, one with a main jet fitted and the other with an air correction jet fitted. Which carb and barrel were those pulled from?

As for the enrichment device, those are sold as an assembly, no individual parts for the device are serviced. The primary reason is that they are rather fiddly internally and difficult to set up if taken apart and then reassembled. As a general rule, I don't even bother to connect them. There are couple of things that you can do to eliminate them but I would like more detail on exactly where the fuel is coming from before going there.

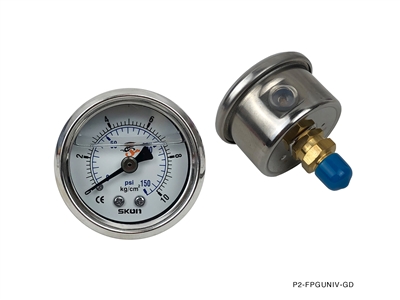
As for fuel pressure, you're still shooting in the dark on that. When i say low single digits of fuel pressure, I'm talking in the range of ~2 psi ± 0.5. Since gauges tend to be most accurate when operation in the middle of their range, ideally a 5psi max gauge would be the hot lick, but I don't know of any that go there and are back mount 1/8" NPT. Closest I know about are 10 psi max but that is better than most that are 15 psi or higher max.

Here's a link to that gauge:


And to get it in the line we go a couple of places for adapters that have been swallowed up and are now part of the "Holley Empire:"


Well, as you all suspected, it WAS a float level issue. Adjusted it, and that problem is behind me.

I learned that a weber cannot leak fuel from the bottom of the bowl.

The car starts easily, runs nicely and needs some adjustments.

Oh, and eventually, the bonnet needs to get back on!
 
Similar threads
Thread starter Title Forum Replies Date
bravenrace WTB - TVR 2500M TVR 0
O TVR 2500m weatherstrip source needed TVR 2
Z Just Restored 1973 TVR 2500M, Barn Find TVR 24
T Tvr 2500m For Sale, Nice Original Solid Example. TVR 1
Jastx TVR 2500M tires - what are you running TVR 7
M TVR 2500M Model TVR 4
J TVR 2500M Shop Manual TVR 9
D TVR 2500M Parts Car.......For Sale Other British Cars 6
Slider748 TVR 2500M vs TR6 Other British Cars 6
D TVR 2500M wheel question? Other British Cars 3
R TVR (Triumph) Hubs…. Hub or Lug Centric? TVR 2
B TVR Tuscan-US parts TVR 4
S 1978 TVR 3000S and The Wall Street Journal TVR 1
S 1972 TVR Vixen 2500 S4 Hybrid Upgrade TVR 6
Basil I must be getting old - TVR forum! TVR 4
R TVR at INDE Motorsports Ranch TVR 1
R July 20 2024 - TVR Featured Marque at the Hudson (Cleveland Oh) BCD TVR 0
R For Sale Nice TVR 280i For Sale Other British Classifieds 6
P TVR Big Valve 4.3 TVR 0
T I added another TVR to the fleet. TVR 10
R Old History - List of USA TVR Authorized Dealers TVR 10
J 1985 TVR 280i Speedometer Cable TVR 4
JoeO 72 TVR Vixen hybrid restoration TVR 1
JoeO 71 TVR Vixen V8 Conversion TVR 26
Grantura_MKI TVR owners. TVR 3
M 1963 TVR Grantura TVR 6
2 1972 TVR Vixen 2500 Radiator TVR 6
Grantura_MKI New TVR TVR 2
arcom For Sale TVR T-Slot 14" Rim and Tire Other British Classifieds 0
JPSmit TVR Typhon Spotted 0
Mickey Richaud TR2, TVR Chimaera, MGB... Spotted 8
D Changes in TVR Parts Supply TVR 1
D TVR Tuscan headlining Bows TVR 2
D Nice looking TVR Vixen S2 For sale TVR 1
J TVR engine advice please TVR 7
I TVR shop manual TVR 7
glemon Great Wheeler Dealers tonight, Lamborghini and TVR Other Cars 1
T TVR Vixen TVR 3
B TVR with Essex V-6 engine question TVR 5
Z TVR Tuscan Spin Mid Ohio 2012 Racing 0
Marvin Gruber TVR Value TVR 1
T 1972 tvr 2500 TVR 3
aeronca65t TVR EBay-MD TVR 2
Z Mid Ohio TVR / Watkins Glen GT40 Racing 15
aeronca65t TVR for sale TVR 0
aeronca65t Turkey Bowl-TVR TVR 12
Tullamore Rearended in TVR Vixen TVR 16
aeronca65t Another TVR-NH TVR 1
C Very nice Triumph-Powered TVR 2200 Special Racing 9
R Great Showing of TVR's TVR 4

Similar threads

Back
Top