• Hi Guest!
    If you enjoy and benefit from your participation at British Car Forum, please consider supporting our efforts with a subscription.

    There are some perks with a member upgrade!
    **Upgrade Now**
    (PS: Subscribers don't see this banner)
Tips
Tips

TR2/3/3A Not for the faint of heart: Fender Horror Show

If I remember correctly Lionel used a drum to form his. I would think anything with a large radius similar to the radius of the channel you are replacing. Large tire 55 gallon drum ,concrete drainage pipe. If a heat and air company is close they might have a roller to make round duct work that they could roll the radius for you. Keep trying, you will get it done.
 
I traced the original radii on my sheet then did a lot with my bare hand then tacked it down on one end a bit. I then moved down the rod, tacking and repositioning as I went.

It looked great until I rolled the metal over. I should have only welded on the side away from the roll. A learning experience. The corner threw me though. I'm tempted to not wrap the metal all the way over it just there.

The sheet is large enough to try again. Mostly this is practice. I've been enlisted to weld my dad's panels if I get good enough. He got some from TRF but they are marked Niehaus. Much nicer and larger than the one that came with my car.
 
Also, I think Lionel did something with the tracing the front cowl. Reading his post again and looking at his pictures.
 
Well, I got kind of frustrated with my zombie fenders and moved onto fixing small parts (and sandblasting and using rust restorer on stuff). Still have glue on my transmission tunnel carpet. Patched a couple places on my Dad's 61 (under the windshield, lots of rust throughs) and getting more comfortable with welding.

Started gathering up all my extra parts (did I mention the load of parts that came with my car that don't belong?). Found an extra front bumper for a TR4 that is in really great shape, overiders and all. We'll be heading up to the Roadster Factory's get together in Armagh PA this weekend for their swap meet. If anyone's going, look us up.

My contact that has a pair of fenders for me won't be going, but he did ask if we would be in Georgia for TRA in the end of May. Shipping of said fenders was going to be too expensive so he offered to deliver them there. I don't think I can make it, but if anyone is driving there from Maryland, DC or NC or the like, I can make it worth your while to do me a solid. I can't make it to Georgia and back in a day, but would be willing to drive out as much as 6 hours or so. I also live right off the I-95 cooridor so if you happen to be passing through...
 
I think when people sell an old TR they use the opportunity to get rid of a bunch of unmatched parts they have laying around.
I have a nice full set of gaskets for something, just not a TR3
 
Ron, love your phrase Zombie Fenders. Don't work to close to them. My daughter says they eat your brains!

Excuse me if I am getting a bit confused but I think you are talking about two tasks;
1 making the flange where the outer fender attaches to the inner fender and
2 wiring the edge of a fender.

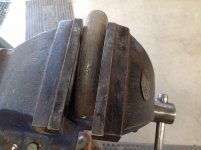
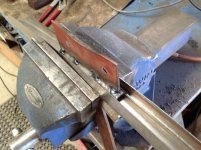
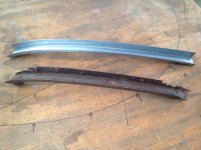
1 When making the flange I drew the curvature of the fender on ply board and cut it out so I had a permanent record of what the shape should be. I could also put the fender in the cutout when attaching the flange to ensure it was locked in the correct shape. Curving the flange by hand I suggested doing it over a drum or some such thing of a good radius. If you are concerned about the low walls of the flange splaying out or in, you can do it over a hard wood former in the jaws of a vice. Cut a short length of wood which is the width of the outside of your flange and cut a curve the same radius you want the flange to be. Clamp it in the jaws just lower than the top edge of the jaws with the curved side up. Setting your flange in the jaws and rocking the flange back and forth over the former will create your curve while the jaws act to restrain sideways flaring of the walls of the flange. You can also cut a thinner piece of hardwood with a concave curve and use this to tap down on the flange to force the curvature. This is basically what I did when making the door capping although a bit more complex. As you can see, even with a flange wall of about one inch on one side it was possible to create a curved channel.
IMG_1487.jpgIMG_1489.jpgIMG_1490.jpg


2 Wiring an edge does not require welding the wire to the panel. Draw a line along the edge to be wired about three times the diameter of the wire in from the edge. Use pliers (if the edge is curved) or a bending bar to bend the edge of the sheet up about 45 degrees along the line. Use a hammer and dolly to bend it back past 90 degrees and then sit your wire in behind it. Use a hammer, pliers etc to roll the metal over the wire at its end to clip the wire in place. Holding the wire in place with a sharp ended dolly, (I also clamp it in place at a few points along its length with vice clamps if possible) you can work the rest of the flange over and down onto the wire. Do it in stages working along the full length of the wire and then starting at the end again until it is rolled for the full length.

I hope I haven't confused things further.
 

Attachments

  • IMG_1491.jpg
    IMG_1491.jpg
    59.1 KB · Views: 65
Ok, that makes sense now. Lionel, you used a single piece of sheet to make both the vertical and horizontal sections of the flange. I was trying to make the two parts to weld together, fighting to get the vertical to the right (correct) radius.

With your way, I only need to work with the radius once, after I've made the combo piece, and work it until the radius matches the cowl/fender. I'll need to match the cowl first on mine, then work my fender's curve to match it.

All this may be academic as I have found (well Dad found) two fenders for me. Shipping was awful, but the fenders are better than what I have and they were very reasonable (very very reasonable). They'll still need some work, but it looks like the flanges are intact, and absolutely no bondo!

I'll still work on this one and see where it takes me. I've gotten a bit better at welding, though practice makes perfect, and I won't quit my day job.

I've gotten really good at cleaning and de-rustifying parts, sand-blasting, and laying down vinyl on cap rails. My seats aren't quite how I'd like them to be, but I'm taking a break from them for now.

I've been putting off the major hurdle I have: getting the tub squared and welded back together. But that is for another thread.
 
Similar threads
Thread starter Title Forum Replies Date
B Turbocharged Rotary-Powered Bugeye. Not for the faint of heart... Spridgets 9
I TR6 TR6 ignition light faint - this can't be good Triumph 35
DNK OK everyone ,don't faint... Triumph 13
T Looking for a temporary cup holder - but my heart is pure Spridgets 9
Morris Kids make my heart burst... again Spridgets 2
dougie Elkheart Lake Vintage Festival 2012 Austin Healey 7
Sopwith_Camel heart surgery Spridgets 3
Scott_Hower E-type retro by Lyonheart [aka Growler] Jaguar 1
regularman Something to warm the heart on a cold winter day. Spridgets 6
S A40 Devon heart transplant Other British Cars 4
jlaird A Heart for Miss Agatha Spridgets 2
Randy Forbes Interior decorator... eat your heart out! Austin Healey 8
Sergio MGA MGA 60 ROADSTER WITH BIG HEART JAG XJS V12 MG 6
Sergio MGA 1960 WITH A BIG HEART XJS V12 Jaguar 10
Basil Plating some parts - Heart attack! Jaguar 17
DornTRoriginal Wanted TR3B Left rear fender Triumph Classifieds 7
ccw283 GT6 GT6 fender flares Triumph 1
JCL TR4 TR4/4A Strange Problem Fitting Inner Fender Triumph 18
R Fender Spear Potential Rattle Austin Healey 6
Popeye TR4/4A Rear fender attachment: wing to lamp housing clip? Triumph 7
5 TR2/3/3A TR3 fender patch panel question Triumph 10
H TR4/4A Fender/Wing repair how to do Triumph 5
af3683 TR2/3/3A TR-2 / TR-3 Rear Bumper Wrap Around Fender Guards Identification Triumph 0
S For Sale Triumph TR 2-3 Front Left Fender Triumph Classifieds 2
M TR2/3/3A TR3 Small Mouth Inner Fender Holes Triumph 3
B Wanted Bugeye front bonnet fender mirror like this Spridgets Classified 5
K TR2/3/3A TR3's without the fender mirrors........... Triumph 6
1 TR3 Fender spats sold on EBay. Triumph 5
K TR2/3/3A Passenger side fender mirror....... Triumph 13
BoyRacer Rubber Fender Buffers Austin Healey 2
vette MGB Rear Fender Dog Leg Patch Panel MG 3
M TR2/3/3A Front Inner Fender Doublers Triumph 2
Jim_Stevens TR2/3/3A Rear fender stays: black or body color? Triumph 8
Boink Fender seam annoyance... Spridgets 4
D TR2/3/3A rear fender bead Triumph 2
D TR2/3/3A assembly, TR3A rear fender and radiator stays Triumph 22
T For Sale GT6 Mark II Right Front Fender - NOS Triumph Classifieds 0
D Wing Fender Fitment Question Austin Healey 6
P Wanted 1963 TR4 passenger fender rear Triumph Classifieds 2
L TR2/3/3A Scuttle / front fender attachment Triumph 9
M Wanted Wanted TR4A/TR250 passenger side front fender Triumph Classifieds 0
DornTRoriginal TR2/3/3A Fender Bead Installation Triumph 10
55modified Should I remove driver's side fender to work on footbox on my BN1? Austin Healey 14
S T-Series front fender MG 1
Banjo Missionary in need of a Defender Guru Rover / Land Rover 1
I Wanted 69 TR6 fender Triumph Classifieds 0
B Wanted I'm looking for a boot [trunk] lid and drivers rear fender for a 100/6 or 3000 Austin Healey Classifieds 0
K TR2/3/3A TR3 Spats?...Fender Skirts. Triumph 3
R Fender bolts Austin Healey 10
aero3113 1956 100 BN2 Fender Beading Austin Healey 8

Similar threads

Back
Top