Hi
(new core plug put i place and hit in centre with round headed hammer)
This right here is your problem. I don't care how many different places you have read it or heard it, it is WRONG!
I was shown the correct way 40+ years ago by the machinist who prepped my 100 block during a rebuild. The dish-type plugs seal and hold in place by generating outward pressure while being nearly flattened. The proper tool will leave a slightly concave center in spite of the tool being essentially flat. This is probably where the incorrect method came from.
Go to this page
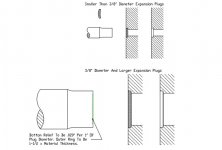
https://www.hubbardspring.com/product/expansion-plugs-brass/ and then click on "installation instructions". There you will find the image below.

You will see that the tool is flat with a slightly dropped center. This will create considerably more outward pressure to secure the plug. My 100 is good testimony to that. Never lost a core plug and never had weeping from the perimeter. Old age and corrosion did them in. They were replaced last year with brass. If they ever need replacing again it wont be by me. I dont expect to be around another 42 years.
As a distant second to the correct tool, one
could use a socket of nearly the diameter of the plug. Turn it around so the back of socket faces the plug. Using a (sacrificial) extension(make sure it does not protrude past the back of socket) strike the plug until it is close to flat around the perimeter. No need to get carried away, you don't want to break the block!
As always, a little sealer in the block cavity for good measure. I always used the Permatex red liquid sealant on core plugs, both to seal the perimeter and coat the surface exposed to coolant.

 Hi Guest!

 smilie in place of the real @
 Pretty Please - add it to our Events forum(s) and add to the calendar! >>


