Offline
Doc asked:
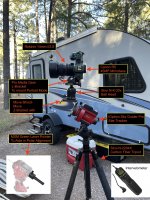
The attached picture shows all the gear I used.

Rube Goldberg would be proud!
Tripod: Sirui N-2204X Carbon Fiber. No longer made, but has been a very light, easy to carry tripod and is very sturdy. Has screw-out spikes for soft dirt areas.
iOptron Sky Guider Pro. You align this with True North (There's an app that helps you set Polaris at the right location in the reticle so as to make sure your pointed at true north (you don't actually point directly at Polaris - just very close to it) NOTE: Once the Star Tracker is polar aligned and level, the camera can be pointed anywhere in the sky and it will track the stars on long exposures.
MSM Z-Bracket. Provides for a level platform to mount the Ball Head. This is not strictly necessary except when doing panos. For single frame images, you can mount the ball head directly on the Star Guider.
Sirui K-20x Ball Head. Bought this when I bought the tripod. It's an ok Ball Head, but sometimes getting the ball tension right is a bit fiddly. If I ever replace it will probably get a Manfroto or equivalent
Pro Media Gear L-Bracket. This is an L-bracket that allows for mounting camera in Portrait mode. I really like this brand because the part of the bracket that is on the side of the camera (for portrait mounting) is moved well froward so that it doesn't block your ports on the side of the camera.
Canon R5 with Rokinon 14mm f/2.8. The Rokinon lens is relatively inexpensive and only manual focus, but it's perfect for Milkyway shots with its fairly sharp 2.8 aperture.
Vello Intervelometer. I use this for triggering the shutter without the need to touch the camera, and it allows me to set the exposure time with the Camera in Bulb mode. (Can also set it to take multiple long exposure shots if I don't have the tracker and want to stack several shorter exposures.)
Laser Pointer. This makes getting the polar alignment correct a breeze. This thing screws onto the back of the tracker scope and literally points right into the sky (must be VERY careful of aircraft!), allowing you to get an initial polar alignment. Then, looking through the scope to do the fine tuning is all your need to do.
At first look, questioned why the need for the ball head. Then realized it's the only way to get the camera level, "X and Y".
And which tripod is that?
The attached picture shows all the gear I used.

Rube Goldberg would be proud!
Tripod: Sirui N-2204X Carbon Fiber. No longer made, but has been a very light, easy to carry tripod and is very sturdy. Has screw-out spikes for soft dirt areas.
iOptron Sky Guider Pro. You align this with True North (There's an app that helps you set Polaris at the right location in the reticle so as to make sure your pointed at true north (you don't actually point directly at Polaris - just very close to it) NOTE: Once the Star Tracker is polar aligned and level, the camera can be pointed anywhere in the sky and it will track the stars on long exposures.
MSM Z-Bracket. Provides for a level platform to mount the Ball Head. This is not strictly necessary except when doing panos. For single frame images, you can mount the ball head directly on the Star Guider.
Sirui K-20x Ball Head. Bought this when I bought the tripod. It's an ok Ball Head, but sometimes getting the ball tension right is a bit fiddly. If I ever replace it will probably get a Manfroto or equivalent
Pro Media Gear L-Bracket. This is an L-bracket that allows for mounting camera in Portrait mode. I really like this brand because the part of the bracket that is on the side of the camera (for portrait mounting) is moved well froward so that it doesn't block your ports on the side of the camera.
Canon R5 with Rokinon 14mm f/2.8. The Rokinon lens is relatively inexpensive and only manual focus, but it's perfect for Milkyway shots with its fairly sharp 2.8 aperture.
Vello Intervelometer. I use this for triggering the shutter without the need to touch the camera, and it allows me to set the exposure time with the Camera in Bulb mode. (Can also set it to take multiple long exposure shots if I don't have the tracker and want to stack several shorter exposures.)
Laser Pointer. This makes getting the polar alignment correct a breeze. This thing screws onto the back of the tracker scope and literally points right into the sky (must be VERY careful of aircraft!), allowing you to get an initial polar alignment. Then, looking through the scope to do the fine tuning is all your need to do.

 Hi Guest!

 smilie in place of the real @
 Pretty Please - add it to our Events forum(s) and add to the calendar! >>


