• Hi Guest!
    If you enjoy and benefit from your participation at British Car Forum, please consider supporting our efforts with a subscription.

    There are some perks with a member upgrade!
    **Upgrade Now**
    (PS: Subscribers don't see this banner)
Tips
Tips

Moss Bumpers

CessnaTPA

Jedi Hopeful
Offline
The bumpers on my 57 100-6 have seen better days with some surface rust and the front slightly twisted. I'm looking at renewing them and possibly getting them from Moss.
I see they offer two choices, $499 and $179, salesman said the more expensive one is for a show car and the other might have a few minor blemishes but is good quality.
I don't foresee ever entering any car shows but don't want to install an eye sore. Has anyone bought or seen the cheaper bumper and what is your opinion?
 
Check Amazon / E Bay you might find a good pair of original bumpers @ a reasonable price.?
 
I bought the cheaper bumpers a few years ago__thinking I would need them on the car to get it licensed/inspected in Ohio__and they're of decent quality, certainly look-wise.

They're probably not quite as heavy, as in gauge thickness, as the originals, but unless someone is doing a side by side comparison, nobody is going to know.

Though mine aren't currently bolted onto the ends of the car, they're visible in the shop if you wanted to see them. Speaking of which, did you go to the All British car show a couple weeks ago in Safety Harbor? You might've seen my car__without bumpers__right in front of the gazebo.
 
I installed a set on my BT7 about 10 years ago and they still look great. As Randy said, they are a fraction thinner than the originals and may be slightly different in profile, but unless you were on your knees and had an original in hand, 99.9% of the population could not tell the difference. That being said, I had one of my original bumpers rechromed to put on my just restored car and it cost about $350 for the rechromed.
So it will have one original and one reproduction installed. It will be interesting to see if anyone notices.
 
I was going to look into what it cost to have them rechromed but like I said the front is twisted. Probably could straighten it out but think I'll just go with the Moss route since you guys say they are ok.
I didn't make the British car show, I had to work, maybe next year and I'll bring my car. Thanks for the input everyone.


I bought the cheaper bumpers a few years ago__thinking I would need them on the car to get it licensed/inspected in Ohio__and they're of decent quality, certainly look-wise.

They're probably not quite as heavy, as in gauge thickness, as the originals, but unless someone is doing a side by side comparison, nobody is going to know.

Though mine aren't currently bolted onto the ends of the car, they're visible in the shop if you wanted to see them. Speaking of which, did you go to the All British car show a couple weeks ago in Safety Harbor? You might've seen my car__without bumpers__right in front of the gazebo.
 
I was going to look into what it cost to have them rechromed but like I said the front is twisted. Probably could straighten it out but think I'll just go with the Moss route since you guys say they are ok.
I didn't make the British car show, I had to work, maybe next year and I'll bring my car. Thanks for the input everyone.

You'd think anyone old enough to know how to straighten a bumper would be getting up there. Mine were evidently straightened by hand - they have a lot of cold-chisel marks inside them and I'm guessing that's how they were straightened.
 
My first thought was tying a rope to a tree and overrider but even if I got the twist out I'd still have the chrome pitting and rust (and probably a bumper bracket pulled out of the frame) And from what I've read on here it cost more to have them rechomed then just buying new ones.
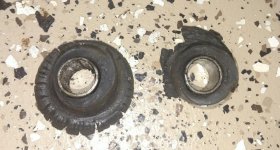
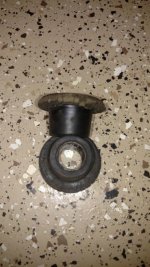
BTW I decided to do the A-arm bushing change out, the old ones were deteriorated looking at the lip but surprisingly the inner rubber looked fine, could they possibly be from 57? The top link bushings were totally shot. I also decided not to use the poly bushings on the A-arms and ordered the rubber ones along with the bumpers and a few other items that should arrive Monday.

Considering how hard they are to replace, they may just be from 1957. If they'd been replaced in the last 20 years, they'd probably look better than that.
 
Top Link bushings and A-arm, obviously the top links take more of a beating.
 

Attachments

  • IMG_20161104_210947.jpg
    IMG_20161104_210947.jpg
    67.9 KB · Views: 108
  • IMG_20161104_211412240.jpg
    IMG_20161104_211412240.jpg
    43 KB · Views: 103
Be sure to set the A-arm height correctly BEFORE TIGHTENING the lower/inner bush pins, or you'll shear your brand new rubber. Same goes for when you tighten the upper/outer pin too.

The lower/outer (threaded) ends have their own procedure, which is detailed in the Bentley manual (not sure if it is as well described in Hayne's or other versions). If you haven't already inspected these for wear, I recommend that you do so; any deferred maintenance__like frequent greasing__and these metal-on-metal parts develop uneven wear pretty quickly. Who knows how old they are, given that you're thinking the rubber bushes may be original?

Failure to set up the front suspension pivots/assembly properly will result in a reduced service life for your new components, and you'll be doing the job again soon thereafter.

Do it right: do it once. If you want some visual aids, I can probably come up with a few pictures...
 
Thanks Randy for the reminder of setting the A-Arm height first. I have the Bentley manual but don't remember seeing anything about how to set the height. What's the best method?
I have the A-Arm off the car and can feel a tiny bit of play in each arm at the lower outer bearing that's consistant at all points of movement. Is it acceptable to have a little play?
Before removing the wheels both sides felt pretty solid with vertical and horizontal movement.

Pics are always welcomed as with seeing the one of removing the coil spring made it very clear what the book was trying to explain.

Be sure to set the A-arm height correctly BEFORE TIGHTENING the lower/inner bush pins, or you'll shear your brand new rubber. Same goes for when you tighten the upper/outer pin too.

The lower/outer (threaded) ends have their own procedure, which is detailed in the Bentley manual (not sure if it is as well described in Hayne's or other versions). If you haven't already inspected these for wear, I recommend that you do so; any deferred maintenance__like frequent greasing__and these metal-on-metal parts develop uneven wear pretty quickly. Who knows how old they are, given that you're thinking the rubber bushes may be original?

Failure to set up the front suspension pivots/assembly properly will result in a reduced service life for your new components, and you'll be doing the job again soon thereafter.

Do it right: do it once. If you want some visual aids, I can probably come up with a few pictures...
 
Wow ... those look really nice (and they include the overriders!). Price is reasonable, too, IMO. Last time I saw an OEM bumper for sale they wanted $300 for one, and that was years ago.
 
Be sure to set the A-arm height correctly BEFORE TIGHTENING the lower/inner bush pins, or you'll shear your brand new rubber. Same goes for when you tighten the upper/outer pin too.

...
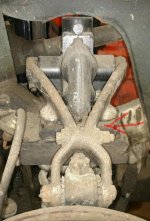
A 2" block of wood between the upper A-arm and shock mounting surface works well for this, unless you are Randy, then you have to carefully machine a block of steel.
 
Just to confirm I understand correctly, an actual 2" block of wood, not a 2x4 which is less than 2" in the location I have a red arrow pointing to? Thanks
A 2" block of wood between the upper A-arm and shock mounting surface works well for this, unless you are Randy, then you have to carefully machine a block of steel.
 

Attachments

  • IMG_20161106_144432.jpg
    IMG_20161106_144432.jpg
    47.6 KB · Views: 114
You are right.
Cut 2 inches from the length of a 2 X 4.
Use the 2 " side for front suspension assembly.
Always easier the second time, at least for me.
Good Luck.
Douglas
 
Thanks guys, I'm off the next three days and now have the info to finish this job.
 
I finished installing the bumpers yesterday and overall very happy with them. Salesman did warn me the holes might not line up perfectly which was true on the front & rear.
I wonder if the bolt spacing changed over the years or it's just poor manufacturing. Even the tag light bracket didn't line up. But for the price I now have shinny new bumpers.
 
Similar threads
Thread starter Title Forum Replies Date
ronzet Bumpers from Moss Motors Austin Healey 29
George Zeck Bumpers [Rechrome or New via Moss] ?? Spridgets 18
CJ Burton MGB Moss has a sense of humor MG 0
Scotsman TR4/4A Moss seat covers for TR4A missing spring tensioner pocket Triumph 0
Frameman 1949 New Moss Motors Fuel Tank Austin Healey 10
SNClocks Moss Motors 5-speed install in a Bugeye Sprite Spridgets 2
shadowfever Moss Motors MG Midget seat covers Spridgets 6
Celtic 77 MOSS response issues Restoration & Tools 11
BoyRacer Moss Motors Center Consoles Austin Healey 0
T TR2/3/3A Moss uprated water pump Triumph 6
C Alternative to Moss's BMC Green Engine Paint Austin Healey 10
M TR2/3/3A HVDA Replacement Clutch Disc Available from Moss Triumph 10
S TR2/3/3A Moss Motors Vitesse 5 Speed Conversion Kit Installation Issues Triumph 13
vette Latest Moss Motors Magazine Austin Healey 1
D MGB 3 Main bearing 1800 & Moss Supercharger MG 1
Basil MGB Moss Motors MGB - Jay Leno's Garage MG 3
K TR2/3/3A Moss Improved performance camshaft 851-051...... Triumph 0
BJ8Healeys For Sale Midget/Sprite nose section - used [Moss Motors P/N 455-145] Spridgets Classified 0
J For Sale Triumph TR2 TR3 TR3A New Moss Motors Black Karvel Style Carpet Kit Triumph Classifieds 0
3798j General TR Moss Motors acquires Victoria British Triumph 10
J TR6 Moss HS6 SU conversion kit question Triumph 4
steveg TR6 Moss advance kit maximum advance question Triumph 13
K TR2/3/3A Coil nuts? The SW and CB nuts on a Moss gold coil? Triumph 3
Upland Moss build-a-paper car contest Spridgets 1
K For Sale Front cockpit dash rail...N/A at Moss Triumph Classifieds 0
BLong63AH Moss Supplemental Heat Shield Austin Healey 2
Jim_Gruber In need of 2 Fulcrum Pin Bolts - MOSS Has them on Back Order Spridgets 3
Carlos TR4/4A Moss rear spring distance piece 674-560 Triumph 16
JPSmit Stirling Moss - Sebring Sprite Spridgets 3
KVH TR4/4A Door Seals: Moss Part 249-607 Triumph 0
Simmo TR6 Moss Seats Triumph 0
K TR2/3/3A Installing Moss wheel spacers? Triumph 5
E Moss stainless exhaust offering. Austin Healey 28
R TR2/3/3A New Control head wiring - Moss purchase Triumph 1
Michael Oritt Moss Motors rear brake "set" Austin Healey 11
K TR2/3/3A Moss Europe has restored the Jabbeke TR2 Triumph 0
Jim_Stevens For Sale Pair of chrome tail lamp bases, NIB, Moss 159300 Triumph Classifieds 0
LarryK Moss Motors buys XKs Unlimited parts house. Jaguar 6
P Moss Motors front brake calipers [BJ7 to early BJ8] Austin Healey 8
K TR2/3/3A The "compensator bar" on the Handbrake...#53 in Moss diagram Triumph 5
Jim_Gruber New MOSS Tapered Front Wheel Bearings - WTH are the instructions Spridgets 16
GTP1960 TR2/3/3A Moss Crankshaft pulley failure Triumph 23
L 100/ Moss Heat Shield Austin Healey 2
mt10flyer TR2/3/3A Moss Steering Rack Conversion Triumph 26
Jim_Stevens TR2/3/3A Goodridge SS brakelines from Moss Triumph 3
R Moss permanently lubricated U-Joints Austin Healey 1
S For Sale TR6 New Moss 73-76 Seat Foam Kit Triumph Classifieds 0
M TR2/3/3A Fitting on Moss Brake/Clutch Masters Triumph 16
D TR2/3/3A Moss alternator kit Triumph 8
croz TR2/3/3A Moss Replacement front disc pads Triumph 3

Similar threads

Back
Top