• Hi Guest!
    If you enjoy and benefit from your participation at British Car Forum, please consider supporting our efforts with a subscription.

    There are some perks with a member upgrade!
    **Upgrade Now**
    (PS: Subscribers don't see this banner)
Tips
Tips

Another Restoration Thread - Advice Welcome [and Needed]

blueskies

Jedi Warrior
Country flag
Offline
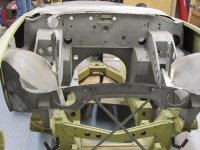
A month or so ago on this forum, I mentioned acquiring a '57 100-6, in pieces. Someone asked for pictures; sorry it took so long.

The story is that the car has not been driven for forty years or so, with a restoration planned that whole time. The teenager who bought the car back then took it apart, but that was as far as he got with it. A few years ago, his father, a retired body work instructor, began work on the car. He was known for the high quality of his work and totally restored various exotics for a well known car museum. But health problems prevented him from finishing the Healey.

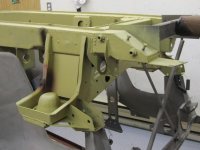
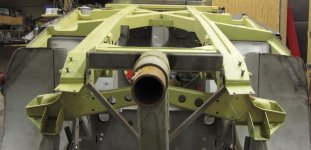
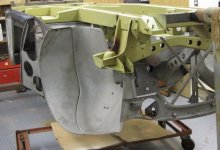
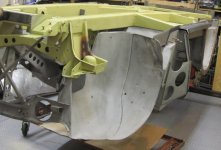
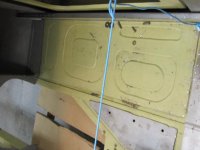
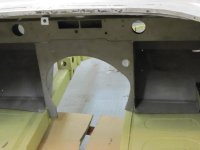
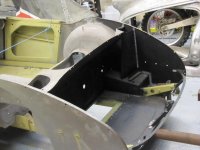
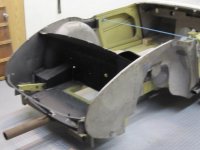
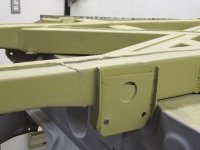
Prior to the restoration, the car had a fair bit of rust. From what I was told, the bottom was cut out of the frame, a new inner frame made of 16 gauge metal was installed inside the original 15 gauge frame to add rigidity and reinforcement, and then the outer frame was rebuilt. Most of the new pieces - floors, trunk parts, engine compartment parts - seen in the pictures were made by hand using an English wheel and other metal working tools; they are not from a supplier.

The car is now mounted on my rotisserie. Although I certainly don't have the skills or experience of the person who started the restoration, I hope to continue on with the work. I have done frame off restoration work on American cars; if nothing else, that has given me an appreciation of how much work is involved.

It seems to me that the next thing to do is to paint the frame/chassis body color. Before going ahead with that, I'm waiting for the heritage certificate to confirm the original color of the car, which I was told was red. I'm going for originality, as much as possible. After painting underside and interior of the car, the plan is to make it into a roller. Does this plan make sense, or am I missing something?

This car and another '57, also in pieces, came with lots of parts, some new and some well used. The list of parts to rebuild and buy is long.

Here are a few pics of the work that has already been done. A few of the pictures were taken before mounting the car on the rotisserie. The rest are taken on the rotisserie, with the front fenders and doors again removed.

Comments appreciated.
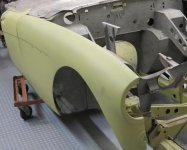
resto front.jpgresto upside down 4.jpgresto upside down 3.jpgresto upside down 2.jpgresto upside down 1.jpgresto inner 2.jpgresto inner.jpgresto rear 2.jpgresto rear.jpgresto front 2.jpgresto upside down 5.jpg
 
If you haven't yet, I'd make sure the frame is square and all the body panels mount correctly. Hard to know exactly what was finished.
 
You might want to look at some photos of other Healeys of that vintage, perhaps andrea's: https://plus.google.com/photos/112770819864514987162/albums?banner=pwa to get an idea of what the chassis should look like. For example, the braces on the door hinge pillars are incomplete, and it looks like the sill extensions to the front inner fenders are also incomplete. I noticed what look like pop rivets on some floor pieces. Those should be welds. I recall British Car Specialists in Stockton, CA, has an extensive photo set of a '57.
 
Yep I noticed all the pop rivets to , I sure hope someone is going to do all the welding before assembly/paint etc
 
Blueskies, it is too early to paint. As pointed out, there are some things missing, most notably around the door openings. Besides the things mentioned by John, the shut pillar looks incomplete. I suggest you take the Moss catalog, open to the page with the exploded view of the inner body panels, and check off everything you see on the car. Very odd that the hinge pillar supports have been cut in half, and dang shame about the floor being pop riveted since that involved drilling holes in the frame.
 
Yeh, I agree with the others about the pop rivets. The body/frame assembly of the Healey needs all the rigidity that it can get. When I put the floors in my BJ7 i welded 1 to 1-1/2" beads all around with about the same length gaps in between. I then seam sealed the complete perimeter. You could still do that. I would drill out the rivets. What rivet holes don't get closed up with the welding could then be seam sealed. As also said is that with picking up a project at that state you don't know what is true dimensionally. So what I would do is mount the suspension, only enough to set it on its wheels. Then put the engine and trans in place. Just the baulk iron, no accessories, This will weight the monocoque. Now hang the fenders and doors just enough to see it they are close enough to be able to final panel fit at the end. I would also put the top in place and the windshield. Once your satisfied that the monocoque is true enough, then brace it every way. Brace across the top openning of the doors, ( only if the inner sill at the bottom is holding the bottom correct ), brace across the top ' shoulder area' between the mountings for the top. You might even want to put cross bracing from left to right under the dash to make sure the body structure doesn't get pushed laterally. I used 1/2" angle iron for my bracing. One of the things you might find is the door closure gap is to tight or won't clear the rear fender. The Healey frame starts to get a say in it and the door closure is where it shows up. If the door openning at the top is too narrow, there are different ways to open that up but additional bracing might be required to keep it that way. Well, your well on your way, and you don't have the rust to contend with. It looks like you have all good pieces to work with. Good Luck, enjoy. Dave.
 
Thanks for the very helpful observations and advice. Working on this certainly is very different than the '50s and '60s American cars - with heavy solid frames under them - that I am accustomed to working on. Time to get out the mig welder and tape measure.
 
You'll want to check the main frame rails carefully as they look to have been repaired for rust. Since the frame rusts from the INSIDE out , unless its been chemically stripped , the rails will be rusty inside. You'll want to inspect the rails for softness by using a pick hammer. Now is the time to fix it of course. Finish the inside of the main rails , outriggers , and crossmembers with rust proofing. I fill each main rail with rustproofing (3 gal.) and then let it drain out into a proper receptacle.
 
The fellow who started the restoration cut the frame rails open, added a new inner frame and then repaired the original. So the car has a double frame.

Even so, I like the idea of adding rustproofing inside the frame pieces. What kind of rustproofing do you recommend? (With other cars, I have used Lloyds AD3000 injected into hard to reach areas. It does not harden and will seep into the cracks between metal pieces and other spots that even paint can't reach. It comes in aerosol cans with those long red extension rods included. They use it on metal constantly exposed to salt water, so it likely is good stuff.)
 
The frame measured square, within an 1/8 inch on various measurements. As my friend Bert used to say, "that's good enough for the girls I go with." About fifteen hours of mig welding later, the frame is now solidly fastened to the upper monocoque. This sure is different than the typical American car from that era that has rubber mounts between the body and frame.

After a search of the huge pile of parts that came with the car, I found newly made replacement pieces for behind the doors (B pillar?) and the rather complicated horizontal pieces that go near the top behind that pillar. I wonder if those horizontal pieces/boxes are early BN4 parts only, as the Moss catalog does not show them. I had another '57 100-6, rusty and awaiting restoration, to look at for the placement of these parts. They are now welded in place, after test fitting the doors and rear fenders. I must admit there is a bit of guesswork involved in the placement; time will tell.

The pile of parts also contained the missing lower pieces for the front door pillar supports. They had been cut out for rust repair. The new metal was welded in to the supports, but the repaired pieces had not been welded back onto the car. That is now done.

This means that the time for applying primer is coming closer. As you can see in the pictures near the beginning of this thread, the frame is one color and the monocoque is another color. The former owner mentioned epoxy primer. I'm thinking that the frame and floors are coated in epoxy primer and that the monocoque is coated in an etching primer of some sort. Does that sound correct? If that is the case, my plan is to lightly sand everything, clean everything with a liquid paint prep cleaner, and then shoot new epoxy primer over everything. Then it will be time for the color coat. Thoughts?

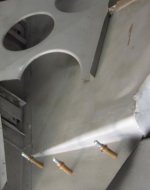
One mystery remains. Does anyone know what the pins in the picture below are called and what they do? Obviously, these are not original Healey parts. But are they used for some body work purpose? They seem to have metal cables inside that go through the sheet metal and into the frame. I have not cut them off yet for fear of ??? who knows.

pins.jpg
 
I don't know what those studs are, some kind of means of holding metal for welding? Anyway, the part that they are sticking out of should be welded to the sill. I can't tell from the photo if it has been welded. Doing so attaches the scuttle to the sill and provides additional rigidity.
 
I don't know what those studs are, some kind of means of holding metal for welding? Anyway, the part that they are sticking out of should be welded to the sill. I can't tell from the photo if it has been welded. Doing so attaches the scuttle to the sill and provides additional rigidity.

The metal now is welded to the sill - it was not welded yet in that picture.
 
Thanks, Randy. Your info led to a Google search and to Cleco Fasteners; I had never heard of them. Reusable, it seems, if one has the correct pliers.

Yep I have a ton of them. You use them for mocking up panels. It allows you to drill all your rivet holes without attaching the panels permanently. Then when your ready to rivet all the holes line up.
John
 
Cleco fasteners were originally used in the aircraft industry for holding panels before riveting them in place I used them extensively for that purpose while building formula race cars and other projects. The pliers are necessary to insert and remove them but they are indispensable for proper fitting of a panel before riveting or welding.
 
Similar threads
Thread starter Title Forum Replies Date
K TR2/3/3A Another odd break down story Triumph 1
waltesefalcon Another one followed me home Other Cars 4
mezy Another panther Lima Other British Cars 27
Y MGB Time for another puzzle piece.... MG 5
P Another beautiful Sunday Spotted 0
L T-Series Another brake prob. ? MG 12
T I added another TVR to the fleet. TVR 10
AngliaGT ANOTHER TR6,& an MGB Spotted 0
Rut MGB Another sad day! MG 10
T General TR Another trans popping out of 2nd Triumph 14
K TR2/3/3A Another electrical problem: Park light & 5ignal light on Drivers side are brighter than....... Triumph 3
JPSmit you won't likely see another Spridgets 4
D TR2/3/3A Another mystery part(s) Triumph 2
Hamish Racing Another 3 sisters spring with commentary Racing 0
K TR2/3/3A Another brake bleed question....... Triumph 17
Sarastro Another SoCal TR3 Spotted 1
7 Wedge Got another one! Triumph 3
Sarastro TR4/4A Another 50K TR4A Triumph 16
D TR2/3/3A Another mystery part Triumph 8
HealeyRick GT6 Another Satisfied Customer Triumph 3
nichola TR6 Another TR6 back on the road Triumph 1
Sherlock Another cruise night, more interesting British iron Spotted 2
D TR2/3/3A Another Carb question. Triumph 22
Healey Nut Another Use for J-B Weld Austin Healey 5
D TR2/3/3A Have exchanged one leak for another. Triumph 10
dbenichou289 TR2/3/3A Another exhausting thread Triumph 10
D TR2/3/3A Another mystery part..or two Triumph 14
John Turney Another Article to Criticize Austin Healey 5
tr6nitjulius TR6 TR6 made another list! Triumph 5
Lin Another Trafficator/Control Head Question Austin Healey 10
Rob Glasgow Can I find Another one as Good? Austin Healey 4
V LED light bulbs : One thing leads to another Spridgets 7
V LED light bulbs : One thing leads to another Austin Healey 2
Editor_Reid Bought Another One Austin Healey 14
tr6nitjulius General TR Triumphest 2019 another one bites the dust! Triumph 2
pkmh Yet Another Oil Question! Austin Healey 8
P TR2/3/3A Another Differential Question Triumph 22
Bob Claffie Spotted another AH Spotted 0
SherpaPilot TR6 Just Another TR6 Column Question Triumph 4
TomMull Post-War Other HERALD Simple Task turns into another project. Triumph 11
jackq Another building full of cars available. Other Cars 0
M TR2/3/3A Another TR3 Piston Ring Gap Question Triumph 1
Lin Another trafficator issue Austin Healey 8
B Another OD question Austin Healey 32
Elva164 Finally did another onboard video! Racing 4
Sarastro TR4/4A Another milestone: first engine start Triumph 8
RAC68 Another Discussion of Trans/OD Fluid Austin Healey 14
Y MGB Another question - this time on seatbelts.... MG 2
PC another one bites the dust... Restoration & Tools 0
AngliaGT Another MGB Spotted 0

Similar threads

Back
Top